
Using managed identities with SQL Azure Database in ASP.NET Core
We are now in a world where we want to eliminate passwords as much as possible, and Microsoft, through its cloud platform Azure, is trying to help us do that. Today, I want to show you how you can secure your SQL Azure database using managed identities so you don’t have to create any SQL Login and carry passwords around.
Prerequisites
To demonstrate this, I will be using the following Azure resources:
- Azure App Service Plan / App Service
- Azure SQL Server
- 1 Azure SQL Database
Make sure you have those already created. You also will need either the Azure CLI or Azure Az powershell module. In my case, I will be using the Azure Az powershell module. Moreover, in order to connect to the Azure SQL Database through Azure Active Directory, there are some computer configuration you need to have. As reference in the documentation, you need:
- .NET Framework 4.6 or later
- Azure Active Directory Authentication Library for SQL Server (ADALSQL.DLL)
For the ADALSQL.DLL, you can meet the requirement by:
- Installing either SQL Server Management Studio 2016+ or SQL Server Data Tools for Visual Studio meets the .NET Framework 4.6 requirement.
- SSMS installs the x86 version of ADALSQL.DLL.
- SSDT installs the amd64 version of ADALSQL.DLL.
In my case, I will demonstrate it using SSMS (SQL Server Management Studio) 2018 preview 6 as this version includes Active Directory support with MFA.
Play time
Now that we are all setup, it is now time to get cracking!
Setting up the administrator in Azure SQL Server
When you setup an Azure SQL Server, you are asked for a username and password to provision the SQL Server with an administrator account. This is a SQL Login account that I define as the “break the glass” account; an account that will be used to connect to the SQL Server in case of a critical emergency. But since we do not want to use this account to do administrative stuff, we will setup the Azure Active Directory Administrator group. There are 2 ways to do that.
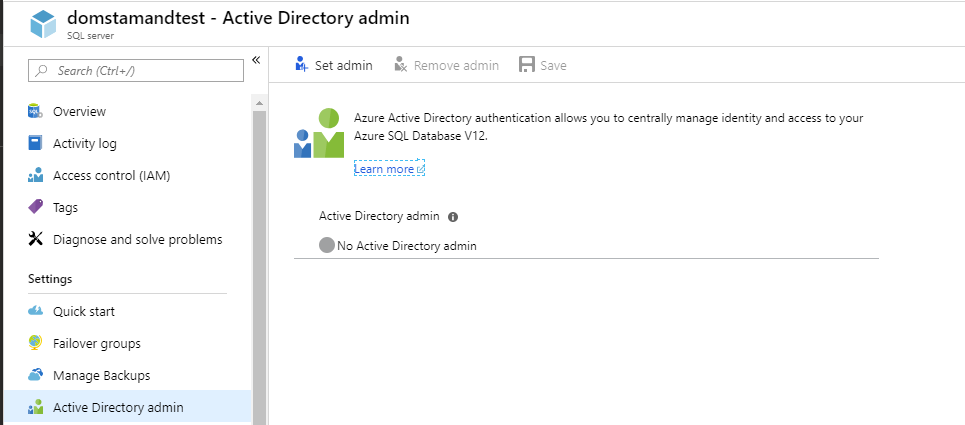
Using the Portal
In the portal, in your SQL Server resource, locate the Active Directory Admin blade. Once in it, set a group or a user as Administrator and press save.
Using Powershell
When using Powershell, you need to get the user’s objectId in the Active Directory. This can be done using the cmdlet Get-AzADUser or Get-AzADGroup depending if you want to set a user or a group. Once you have it, you can use the Set-AzSqlServerActiveDirectoryAdministrator cmdlet to set it. An example would look like this:
|
1 2 3 4 5 6 7 |
# Assigning a group to be the SQL Administrators $groupName = "<your_group_name_here>" $adminGroupObjectId = (Get-AzADGroup -DisplayName $groupName).Id Set-AzSqlServerActiveDirectoryAdministrator -ResourceGroupName $resourceGroup.ResourceGroupName ` -ServerName $sqlServerName ` -DisplayName $groupName ` -ObjectId $adminGroupObjectId |
Adding an Identity to the App Service
Using the ARM template deployment
If you provision your App Services using the ARM template deployment, you can add the following option to your template for Azure to create an Identity automatically
|
1 2 3 |
"identity": { "type": "SystemAssigned" } |
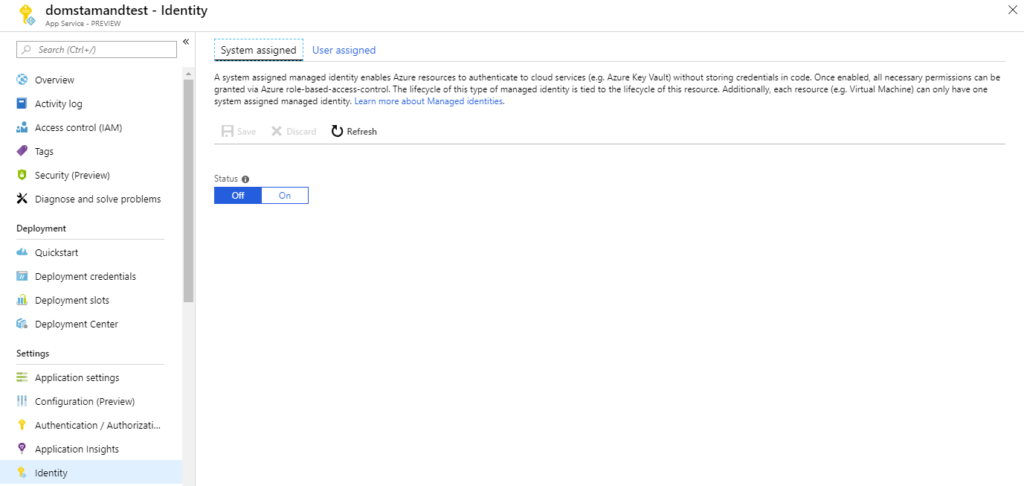
Using the Portal
Navigate to your App Service and locate the Identity blade. Once in the Identity blade, under the System assigned tab, set it to On and save. This will create a principal in your Active Directory with the same name as your App Service (in my case domstamandtest).
Using the Powershell
If you wish to use Powershell, you can use the Set-AzWebApp cmdlet to do so. Here’s an example:
|
1 |
Set-AzWebApp -ResourceGroupName "<your_resource_group_name>" -Name "<your_web_app_name>" -AssignIdentity $true |
Associating the App Service to the SQL Database
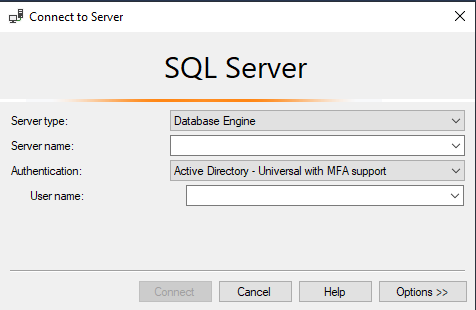
You can now login to your SQL Server using your Active Directory credentials. In SSMS, select the Active Directory – Universal with MFA support option as shown below:
Once you are logged in, select the Database you want the App Service to access. Then execute the following queries:
|
1 2 3 4 |
CREATE USER [your_app_service_name] FOR EXTERNAL PROVIDER; -- creates a user with Azure Active Directory mapped to the App Service Principal ALTER ROLE db_owner ADD MEMBER [your_app_service_name]; -- or you can use the following as well EXEC sp_addrolemember 'db_owner', 'your_app_service_name'; |
This will add the user access to the database and will grant him db_owner. Feel free to add him to the role you want. I used db_owner in my case for simplicity.
If you want to check that the user has correctly been added to the db_owner role, you can execute the following query:
|
1 2 3 4 5 6 7 8 9 |
SELECT DP1.name AS DatabaseRoleName, isnull (DP2.name, 'No members') AS DatabaseUserName FROM sys.database_role_members AS DRM RIGHT OUTER JOIN sys.database_principals AS DP1 ON DRM.role_principal_id = DP1.principal_id LEFT OUTER JOIN sys.database_principals AS DP2 ON DRM.member_principal_id = DP2.principal_id WHERE DP1.type = 'R' ORDER BY DP1.name; |
Tying it all up in the ASP.NET Core application
Now is the time to let our user connect to our Database.
Unfortunately, as of today, the SqlClient (SqlConnection) class does not support the Authentication keyword in .NET Core. If you want to use Authentication=Active Directory Integrated you will need to use the full .NET Framework. Follow this issue to see the status of when this will be available.
Fortunately, we can still tie our user to Azure Active Directory by using the AccessToken property of the SqlConnection class.
To get the AccessToken associated with the class, you need to use the library Microsoft.Azure.Services.AppAuthentication
Then you can do something like the following:
|
1 2 3 4 5 6 7 8 9 10 11 12 |
var cancellationToken = new CancellationToken(); var connectionString = "Server=tcp:dstamand-sqlserver-dev-test.database.windows.net,1433;Initial Catalog=my_catalog;Persist Security Info=False;MultipleActiveResultSets=False;Encrypt=True;TrustServerCertificate=False;"; using (var connection = new SqlConnection(connectionString)) { connection.AccessToken = await new AzureServiceTokenProvider().GetAccessTokenAsync("https://database.windows.net/"); await connection.OpenAsync(cancellationToken); var command = connection.CreateCommand(); command.CommandText = "SELECT 1"; await command.ExecuteNonQueryAsync(cancellationToken); } |
Edit 2022-02-21:
Microsoft has since then updated its SQL Server library to enable use of Managed Identity.
As stated in the documentation:
Since Microsoft.Data.SqlClient 2.1.0, the driver supports authentication to Azure SQL Database, Azure Synapse Analytics, and Azure SQL Managed Instance by acquiring access tokens via managed identity. To use this authentication, specify either Active Directory Managed Identity or Active Directory MSI in the connection string, and no password is required. You can’t set the Credential property of SqlConnection in this mode either.
For a user-assigned managed identity, the client id of the managed identity must be provided when using Microsoft.Data.SqlClient v3.0 or newer. If using Microsoft.Data.SqlClient v2.1, the object id of the managed identity must be provided.
You can see all the authentication modes and ways here.
Deploy the application to your App Service
After deploying your application into your App Service, you will see that you will be able to access to your database, with no password. Magic!