
Installing a Kubernetes cluster on VMware vSphere and what I’ve learned
The topic of containers has been a hot topic for some time now. As a developer and architect, I want to be able to include them in my development SDLC for the various reasons you guys know. I won’t go in detail about them in this article, because after all you came to see how it was done right? :-). After having some container images waiting in a registry and awaiting to be used, I asked myself, how do I manage the deployment, management, scaling, and networking of these images when they will be spanned in containers? Using an orchestrator of course!
Kubernetes (k8s) has become one of the widely used orchestrator for the management of the lifecycle of containers. Kubernetes is something I want to learn more and more. I have a homelab server I built many years ago, and I have figured it would be a great way to put it to use. For the curious, here are the specs:
SuperMicro board X9SCM-F
Intel Xeon CPU E3-1230
32Gig of ram
3TB storage in RAID 5 using a Dell PERC 6/i RAID controller.
Now you may ask: Hey Dom, why didn’t you use a managed k8s service such as AKS, EKS, GCP or even Digital Ocean flavor? Well one of the main reason is that those do cost and can become costly. Also, I wanted to get my hands dirty on the “how”. It’s good to understand how everything is put together and how they all interact.
So how to give yourself a good challenge? Well I told myself I’d setup a 2 master nodes, 3 worker nodes Kubernetes cluster. So how would I do that? I figured the best way to have multiple virtual machines on my homelab would be to install a hypervisor. I picked one, that I believe, has done its proof in the market. I went ahead and installed VMware vSphere ESXi 6.7U3. Kubernetes on prior versions do not work.
Protip: Single ESXi nodes do not work when setting up the cluster. I learned it the hard way. Everything needs to go through VMware vCenter which is the centralized management utility.
So here’s the setup that I’m looking to accomplish
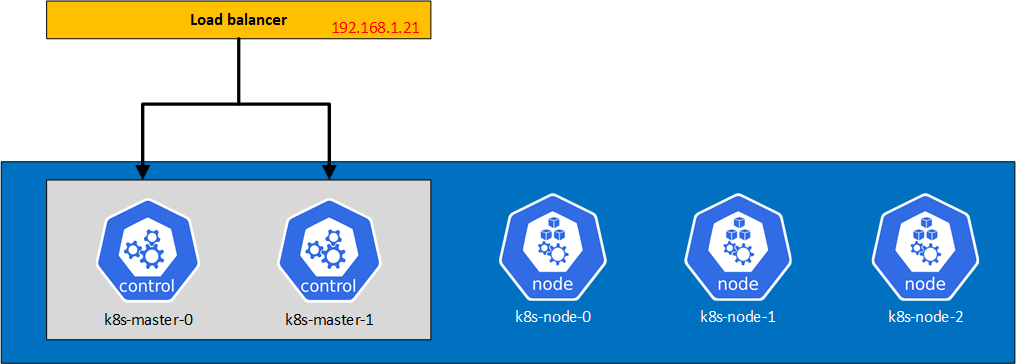
For the load balancer, I used the free version of Kemp Load balancer as it was giving me a quick deployment of a load balancer without having to configure much. My next step is to replace it with HAProxy on Debian.
As I don’t want to re-write the VMware configuration guides, I won’t go in great details, but I will summarize the steps and the challenges I went through (I learned!) when configuring my cluster.
You can find the configuration guides along with outputs here:
Prerequesites
Docker, Kubernetes and Cloud Provider Interface setup (and Cloud Storage Interface test)
Cloud Storage Interface setup
Prerequisites
VMWare components and Guest Operating System
In order to install all the nodes (masters and workers), VMWare recommends Ubuntu, so I picked the version 20.04 LTS. You also need, as I mentioned above, vSphere ESXi 6.7U3 and vCenter. Make sure you update your ESXi to the latest versions as they have done a number of security fixes and overall improvements. This helps for setting up Kubernetes with the vSphere CPI (Cloud Provider Interface) and CSI (Cloud Storage Interface) as they may have corrected certain problems along the way.
vCenter roles and permissions
For the Cloud Provider Interface (CPI), I used my administrator account (Administrator@vsphere.local)
For the Cloud Storage Interface (CSI), I created a user (k8s-vcp) and roles and I assigned that user with the necessary roles to the resources. I looked up what I needed in the prerequisites guide. I had problems initially when setting it up (as I was not using VMware guide!) and my CSI was crashing, so I used my administrator account to make sure it wasn’t a bug. This can help you get started quickly. You can change the account used afterwards, as it’s a secret that is used by the CSI controller.
VMware Virtual Machines
You have to change certain properties on the virtual machines that are used in the cluster. That is you need to enable disk UUID and you need to make sure your virtual machines compatibility is set to ESXi 6.7 U2 or later, if they were not created with that compatibility.
In order to change both, you can do it in the UI, but I preferred to script everything. I used the command line utility govc. govc relies on environment variables to connect to the vCenter. Set the following environment using your preferred shell (for example, export var=value in a *nix system, $env:var="value" in PowerShell):
|
1 2 3 4 5 |
# set to true if your vCenter has self signed certificates GOVC_INSECURE=1 GOVC_URL="https://192.168.1.5" GOVC_USERNAME="<user>@vsphere.local" GOVC_PASSWORD="<password>" |
You can then list your resources as such:
|
1 2 3 4 5 6 7 8 9 10 11 12 13 14 15 16 |
# To retrieve the resources types govc ls # result output /<datacenter-name>/vm /<datacenter-name>/network /<datacenter-name>/host /<datacenter-name>/datastore # To retrieve all the VMs govc ls /<datacenter-name>/vm # result output /<datacenter-name>/vm/<vm-name1> /<datacenter-name>/vm/<vm-name2> /<datacenter-name>/vm/<vm-name3> /<datacenter-name>/vm/<vm-name4> /<datacenter-name>/vm/<vm-name5> |
Changing Disk UUID
Run the following for all the nodes on the cluster, where vm-name is the name of the node vm.
|
1 |
govc vm.change -vm '/<datacenter-name>/vm/<vm-name>' -e="disk.enableUUID=1" |
Changing compatibility
Run the following for all the nodes on the cluster, where vm-name is the name of the node vm.
|
1 |
govc vm.upgrade -version=15 -vm '/<datacenter-name>/vm/<vm-name>' |
Installing Docker and Kubernetes
All the machines in the cluster need to have the swapfile(s) off. So you need to disable swap. I’ve summarized in a script all the steps listed in the guide since I had to do this on all the nodes. I created a file nodesetup.sh and added the following into it. Make sure to run it with sudo. Note that I’m using Kubernetes 1.19.0 and the Docker version 19.03.11 that Kubernetes support.
Make sure to run this on all the nodes.
|
1 2 3 4 5 6 7 8 9 10 11 12 13 14 15 16 17 18 19 20 21 22 23 24 25 26 27 28 29 30 31 32 33 34 35 36 37 38 39 40 41 42 43 44 45 46 47 48 49 50 51 52 53 54 55 |
# Turn off swap swapoff -a sed -i -r 's/(\/swap.+)/#\1/' /etc/fstab # Docker CE apt update apt upgrade -y apt install ca-certificates software-properties-common apt-transport-https curl -y curl -fsSL https://download.docker.com/linux/ubuntu/gpg | apt-key add - add-apt-repository "deb [arch=amd64] https://download.docker.com/linux/ubuntu focal stable" apt update apt install docker-ce=5:19.03.11~3-0~ubuntu-$(lsb_release -cs) -y tee /etc/docker/daemon.json >/dev/null <<EOF { "exec-opts": ["native.cgroupdriver=systemd"], "log-driver": "json-file", "log-opts": { "max-size": "100m" }, "storage-driver": "overlay2" } EOF mkdir -p /etc/systemd/system/docker.service.d && systemctl daemon-reload && systemctl restart docker docker info | egrep "Server Version|Cgroup Driver" # Kubernetes curl -s https://packages.cloud.google.com/apt/doc/apt-key.gpg | apt-key add - tee /etc/apt/sources.list.d/kubernetes.list >/dev/null <<EOF deb https://apt.kubernetes.io/ kubernetes-xenial main EOF apt update apt install -y kubeadm=1.19.0-00 kubelet=1.19.0-00 kubectl=1.19.0-00 apt-mark hold kubelet kubeadm kubectl tee /etc/sysctl.d/k8s.conf >/dev/null <<EOF net.bridge.bridge-nf-call-ip6tables=1 net.bridge.bridge-nf-call-iptables=1 EOF sysctl --system # vm tools # A number of CNI implementations (such Calico, Antrea, and etc) introduce networking artifacts that interfere with # the normal operation of vSphere's internal reporting for network/device interfaces. # To address this issue, an exclude-nics filter for VMTools needs to be applied in order to prevent # these artifacts from getting reported to vSphere and causing problems with network/device associations to vNICs on virtual machines. # see https://github.com/kubernetes/cloud-provider-vsphere/blob/master/docs/book/known_issues.md tee -a /etc/vmware-tools/tools.conf >/dev/null <<EOF [guestinfo] primary-nics=eth0 exclude-nics=antrea-*,cali*,ovs-system,br*,flannel*,veth*,docker*,virbr*,vxlan_sys_*,genev_sys_*,gre_sys_*,stt_sys_*,????????-?????? EOF systemctl restart vmtoolsd |
Configuring the masters
I created a file /etc/kubernetes/kubeadminit.yaml and added the following content into it:
|
1 2 3 4 5 6 7 8 9 10 11 12 13 14 15 16 17 18 |
apiVersion: kubeadm.k8s.io/v1beta1 kind: InitConfiguration nodeRegistration: kubeletExtraArgs: cloud-provider: "external" --- apiServer: certSANs: - 192.168.1.21 apiVersion: kubeadm.k8s.io/v1beta2 controlPlaneEndpoint: "192.168.1.21:6443" kind: ClusterConfiguration useHyperKubeImage: false kubernetesVersion: "v1.19.0" networking: dnsDomain: "cluster.local" serviceSubnet: "10.96.0.0/12" podSubnet: "10.244.0.0/16" |
There’s a few things to note here:
- The reference to an external cloud provider in the nodeRegistration. This is because we don’t have any CPI setup now.
- The certSANs: this is the certificate Subject Alternate Names. Since the apiServer listens on the virtual machine IP by default, it also needs to listen to the load balancer IP. This can also have FQDNs. I don’t have any in my case.
- The controlPlaneEndpoint: This is necessary as the control plane will go through the load balancer.
Time to initialize the cluster
|
1 |
sudo kubeadm init --config /etc/kubernetes/kubeadminit.yaml --upload-certs |
It is important to have the --upload-certs parameter as I will add another master and the certificates for authentication need to be available.
Once the setup has finished, I am presented with the commands to add other control planes as well as worker nodes. I execute the command to join the second master (k8s-master-1 in my case). At this point, all the masters should be configured.
Once I finished configuring and joining all the nodes, I setup kubectl by following executing the following (as my regular user)
|
1 2 3 |
mkdir -p $HOME/.kube sudo cp -i /etc/kubernetes/admin.conf $HOME/.kube/config sudo chown $(id -u):$(id -g) $HOME/.kube/config |
I made sure that all nodes were tainted before continuing to install the CPI. I verified that by executing
|
1 |
kubectl describe nodes | egrep "Taints:|Name:" |
The master nodes should have a taint of type node-role.kubernetes.io/master:NoSchedule and worker nodes should have a taint of type node.cloudprovider.kubernetes.io/uninitialized=true:NoSchedule.
I realized that the coredns pods are in Pending state. Normal, as I don’t have a CPI.
|
1 |
kubectl get pods --namespace=kube-system |
Install a Cloud Network Interface
The Cloud Network Interface (CNI) I installed is Flannel. I installed it by running
|
1 |
kubectl apply -f https://raw.githubusercontent.com/coreos/flannel/master/Documentation/kube-flannel.yml |
Configuring the workers
I exported the master configuration and saved it into discovery.yaml.
|
1 |
kubectl -n kube-public get configmap cluster-info -o jsonpath='{.data.kubeconfig}' > discovery.yaml |
I then copied this file on all the worker nodes using scp
|
1 |
scp discovery.yaml user@host:/etc/kubernetes |
On the first worker node, I created the file /etc/kubernetes/kubeadminitworker.yaml and copied the following into it
|
1 2 3 4 5 6 7 8 9 10 11 |
apiVersion: kubeadm.k8s.io/v1beta1 caCertPath: /etc/kubernetes/pki/ca.crt discovery: file: kubeConfigPath: /etc/kubernetes/discovery.yaml timeout: 5m0s tlsBootstrapToken: <token> kind: JoinConfiguration nodeRegistration: kubeletExtraArgs: cloud-provider: external |
In your case, replace <token> with the token that was shown in the output when you first configured kubernetes on the first master node.
I then joined this worker node to the cluster:
|
1 |
sudo kubeadm join --config /etc/kubernetes/kubeadminitworker.yaml |
and I repeated this process for the other worker nodes
Setting up vSphere Cloud Provider Interface (CPI)
CPI configuration file
First step is to create a configuration file for this CPI.
Protip: do not use the INI based version. This is for the older CPI versions. The YAML is the preferred way to go. See all the configuration value here. In my case I was able to use the following config:
|
1 2 3 4 5 6 7 8 9 10 11 12 13 14 15 |
# Global properties in this section will be used for all specified vCenters unless overriden in VirtualCenter section. global: port: 443 # set insecureFlag to true if the vCenter uses a self-signed cert insecureFlag: true # settings for using k8s secret secretName: cpi-global-secret secretNamespace: kube-system # vcenter section vcenter: homelab: server: 192.168.1.5 datacenters: - homelab |
I saved it to /etc/kubernetes/vsphere.conf and then I created the configMap that will be used by the CPI controller pod
|
1 2 |
cd /etc/kubernetes kubectl create configmap cloud-config --from-file=vsphere.conf --namespace=kube-system |
I also created a secret that is used in that configMap. I created the file cpi-global-secret.yaml and added the following content in it. Make sure to delete the file once you have added the secret.
|
1 2 3 4 5 6 7 8 |
apiVersion: v1 kind: Secret metadata: name: cpi-global-secret namespace: kube-system stringData: 192.168.1.5.username: "Administrator@vsphere.local" 192.168.1.5.password: "<password>" |
Then, I added the secret to the cluster
|
1 |
kubectl create -f cpi-global-secret.yaml |
Installing the CPI
Following the creation of the secret, I installed the CPI by executing the following commands
|
1 2 3 |
kubectl apply -f https://raw.githubusercontent.com/kubernetes/cloud-provider-vsphere/master/manifests/controller-manager/cloud-controller-manager-roles.yaml kubectl apply -f https://raw.githubusercontent.com/kubernetes/cloud-provider-vsphere/master/manifests/controller-manager/cloud-controller-manager-role-bindings.yaml kubectl apply -f https://github.com/kubernetes/cloud-provider-vsphere/raw/master/manifests/controller-manager/vsphere-cloud-controller-manager-ds.yaml |
Edit 2022-01-17:
It seems that the files are not available anymore. This is due because master has changed and I didn’t pin a specific version.
They see to have combined all the YAML configurations together. For the sake, I’ve pinned it to the 2.4 release. You can find the file here. To follow the exact steps above, the files can be found here.
Once executed, all the pods in the kube-system namespace should be at the running state and all nodes should be untainted
|
1 2 3 4 5 |
# check pods kubectl get pods --namespace=kube-system # check taint kubectl describe nodes | egrep "Taints:|Name:" |
All the nodes should also have ProviderIDs after the CPI is installed. If some are missing you can manually add them using govc
To check if some are missing, run the following:
|
1 |
kubectl get nodes -o json | jq '.items[]|[.metadata.name, .spec.providerID, .status.nodeInfo.systemUUID]' |
If you have any null values for a node, you will need to patch the node with the providerID. The providerID is required for the CSI to work properly.
|
1 2 3 4 |
# get the VM UUID govc vm.info -json /<datacenter-name>/vm/<vm-name> -e=true | jq -r ' .VirtualMachines[] | .Config.Uuid' # patch the node kubectl patch node <node_name> -p "{\"spec\":{\"providerID\":\"vsphere://<VM_UUID>\"}}" |
Be careful as you can only patch it once. If you make a mistake you will have to reset the node and rejoin it to the cluster.
Here you can find a full script provided by VMware in an older configuration guide if you want to update more than 1.
Installing the Cloud Storage Interface (CSI)
The CSI is a little bit trickier, but not as much.
First I created the configuration file csi-vsphere.conf and added the following in it:
|
1 2 3 4 5 6 7 8 9 |
[Global] cluster-id = "homelab001" [VirtualCenter "192.168.1.5"] insecure-flag = "true" user = "<user>@vsphere.local" password = "<password>" port = "443" datacenters = "homelab" |
Here for the user/password combination, I used a user that I created, k8s-vcp and I’ve associated the permissions that I’ve setup early in the right resources. If you want to skip all of that jazz, just use the Administrator account. for the possible values of the config file, refer to the guide.
I then created a secret out of that configuration file
|
1 |
kubectl create secret generic vsphere-config-secret --from-file=csi-vsphere.conf --namespace=kube-system |
and created all the necessary for the CSI driver.
|
1 2 3 |
kubectl apply -f https://raw.githubusercontent.com/kubernetes-sigs/vsphere-csi-driver/master/manifests/v2.0.0/vsphere-7.0/vanilla/rbac/vsphere-csi-controller-rbac.yaml kubectl apply -f https://raw.githubusercontent.com/kubernetes-sigs/vsphere-csi-driver/master/manifests/v2.0.0/vsphere-7.0/vanilla/deploy/vsphere-csi-controller-deployment.yaml kubectl apply -f https://raw.githubusercontent.com/kubernetes-sigs/vsphere-csi-driver/master/manifests/v2.0.0/vsphere-7.0/vanilla/deploy/vsphere-csi-node-ds.yaml |
I then verified everything was deployed properly by running the following commands
|
1 2 3 4 5 6 7 8 9 |
# verify that the CSI driver has been successfully deployed kubectl get deployment --namespace=kube-system kubectl get daemonsets vsphere-csi-node --namespace=kube-system # verify that the vSphere CSI driver has been registered with Kubernetes kubectl describe csidrivers # verify that the CSINodes have been created kubectl get CSINode |
Testing the CSI driver
In order to test the CSI driver, I installed MongoDB. But before installing MongoDB, I created a storage policy in vCenter named Storage-Efficient. This is going to be used to create volumes. You can add a storage policy by going into vCenter menu -> Policies and profiles -> VM Storage Policies. My policy is using a Host based rule, has Encryption disabled and Storage I/O Control set to Normal IO shares allocation.
Protip: If you enable encryption, make sure you have the proper overall setup that comes with it, that is a Key Managed Service and all that. If you don’t do that, you will get errors when Kubernetes will try to create volumes.
Installing Mongo
I followed the steps listed in the configuration guide, and I checked that the statefulset was properly created and that the Persistent Volume Claims were also successfully created.
You should get an output similar to this
|
1 2 3 4 5 |
# kubectl get pvc NAME STATUS VOLUME CAPACITY ACCESS MODES STORAGECLASS AGE mongodb-persistent-storage-claim-mongod-0 Bound pvc-ea98b22a-b8cf-11e9-b1d3-005056a0e4f0 1Gi RWO mongodb-sc 13h mongodb-persistent-storage-claim-mongod-1 Bound pvc-0267fa7d-b8d0-11e9-b1d3-005056a0e4f0 1Gi RWO mongodb-sc 13h mongodb-persistent-storage-claim-mongod-2 Bound pvc-24d86a37-b8d0-11e9-b1d3-005056a0e4f0 1Gi RWO mongodb-sc 13h |
You should also see in your vCenter that your volumes were created (you can tell when an operation is happening if you check out the tasks in your vCenter). You can check that by navigating to your datastore, and clicking the Monitor tab. The volumes are created under the Cloud Native Storage -> Container Volumes.

Cleaning up
Once I was confident that everyone worked, I cleaned up the test by deleting the statefulset and deleting the PVCs
|
1 2 |
kubectl delete statefulset mongod kubectl get pvc --no-headers=true | awk '/mongodb/{print $1}' | xargs kubectl delete pvc |
Tips, tricks and troubleshooting
Updating a secret
I often had to update one or more secrets. For instance, in my CSI, I changed the user from Administrator to k8s-vcp. I could do that by running
|
1 |
kubectl create secret generic vsphere-config-secret --from-file=csi-vsphere.conf --namespace=kube-system -o yaml --dry-run=client | kubectl apply -f - |
If you do change the csi config secret, you need to recreate the pods, which can be done using
|
1 |
kubectl get pods -n kube-system --no-headers=true | awk '/vsphere-csi/{print $1}' | xargs kubectl delete pod -n kube-system |
Flannel failing
It happened at some point when I was first setting up the cluster (yes I actually scrapped everything and restarted a few times to make sure everything was good), that some pods stuck on ContainerCreating. When reading the logs, it showed: failed to set bridge addr: “cni0” already has an IP address different from 10.244.6.1/24. It’s apparently a known problem in Flannel.
I fixed it by running those commands on the nodes that were problematic:
|
1 2 3 4 5 |
sudo systemctl stop kubelet sudo systemctl stop docker sudo ip link delete cni0 sudo systemctl start docker sudo systemctl start kubelet |
Resetting a node
It happened a few times that I had to reset a node and start back the process (i.e. rejoin the cluster). To do that, I used the following commands
On a machine having kubectl access
|
1 2 |
kubectl drain <node_name> --delete-local-data --force --ignore-daemonsets kubectl delete node <node_name> |
On the node I wanted to clean up
As a superuser:
|
1 2 |
kubeadm reset sudo iptables -F && sudo iptables -t nat -F && sudo iptables -t mangle -F && sudo iptables -X |
Regenerating the join commands
If you don’t want to use the config straight from a file (the step where we generated the discovery.yaml) file, you can do the following to join a master or a worker node to the cluster
Joining a master node (control plane) to the cluster
Re-upload the certificates. They should have a TTL, but long enough so that you have time to rejoin right away.
|
1 |
sudo kubeadm init phase upload-certs --upload-certs |
Copy the certificate key that gets outputted and use it with the --certificate-key parameter
Joining a worker node to the cluster
|
1 |
sudo kubeadm token create --print-join-command |
This will give you the --token <token> parameter along with the --discovery-token-ca-cert-hash sha256:<hash> parameter