
Self-hosting a MCP Registry for discovery using modelcontextprotocol.io registry
I’ve been having a lot of conversations with customers lately about how to improve governance around MCP (Model Context Protocol) servers when using AI-powered development tools like GitHub Copilot. Right now, most organizations fall into one of two camps:
- MCP servers are completely disabled because there’s no way to control what developers can use.
- Everything is wide open, like an all-you-can-eat buffet.
Neither approach is ideal. Why? One, disabling all of them limits the power of the AI-powered development tools. Two, with having everything wide open, one can install a MCP server which can run arbitrary code on its machine. If you’re using MCP servers, you should only add servers from trusted sources and double-check both the editor and server configurations before starting them.
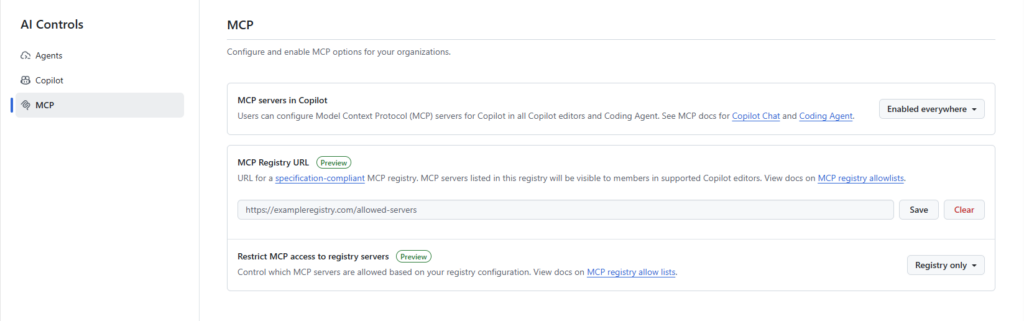
So, how do you tighten governance? The good news is that GitHub has been working on this for a while. They’ve introduced new controls (see Internal MCP registry and allowlist controls for VS Code Insiders – GitHub Changelog and MCP registry and allowlist controls for VS Code Stable in public preview – GitHub Changelog).
Admins can now configure MCP registries and enforce allowlist policies right from the administrative interface. This means enterprises can control which MCP servers are available for install in IDEs, giving them much better governance and security.
Let’s take a step back and look at the types of MCP servers you can use today. There are two main options:
- Local servers using STDIO transport
- Local or remote servers using streamable-http (HTTP) transport
If all the MCP servers you plan to allow are remote and use the streamable-http type, you are in luck. You can easily leverage the MCP server functionality available in Azure API Center.
But here’s the catch: most real-world scenarios involve a mix of both STDIO and remote HTTP MCP servers. If you want a single registry (or inventory) that includes both types, you’ll need to host your own registry.
You have two choices:
- Build your own API using the MCP server specification for the discovery API. This gives you full control but requires time and effort.
- If that’s not feasible, the Model Context Protocol team provides a ready-to-use Docker container image that you can deploy and get started quickly.
|
1 2 3 4 5 6 7 8 9 10 11 |
# Run latest stable release docker run -p 8080:8080 ghcr.io/modelcontextprotocol/registry:latest # Run latest from main branch (continuous deployment) docker run -p 8080:8080 ghcr.io/modelcontextprotocol/registry:main # Run specific release version docker run -p 8080:8080 ghcr.io/modelcontextprotocol/registry:v1.0.0 # Run development build from main branch docker run -p 8080:8080 ghcr.io/modelcontextprotocol/registry:main-20250906-abc123d |
The container image contains both the discovery and the publishing part.
Getting started
For more information on the development environment of the registry, please read the documentation.
The Docker container image requires the use of PostgreSQL. You can run the container by running the following Docker command:
Note that I am using a Docker network, as the containers will need to be able to communicate with each other. To create a Docker network, run the following command
docker network create mcp-net
Once the database is up and running, you will need to create a database inside Postgres. For this example, I am using the name mcp-registry.
docker run –name pgadmin -d -p 8001:80 -e ‘PGADMIN_DEFAULT_EMAIL=admin@local.tld’
-e ‘PGADMIN_DEFAULT_PASSWORD=admin’ –name pgadmin –network mcp-net dpage/pgadmin4:latest
It will then be available at http://localhost:8001
You now need to prepare the seed data and the environment variables to run the registry container.
Preparing the environment variables
To run the container, you’ll need to provide several environment variables for configuration. Passing them all individually on the command line can get messy, so here’s a simpler approach:
Create a file with your environment variables in the format KEY=VALUE, and then use the --env-file parameter in your docker run command to load them. This keeps things organized and makes your setup easier to manage.
Some documentation for the available env variables can be found here and here. Below is a sample of my configuration:
|
1 2 3 4 5 6 7 8 9 10 11 12 13 14 15 16 17 18 19 20 21 22 23 24 25 26 27 |
# MCP Registry Configuration # Server configuration # defaults to 8080 if not changed, see https://github.com/modelcontextprotocol/registry/blob/main/.env.example #MCP_REGISTRY_SERVER_ADDRESS=:8080 MCP_REGISTRY_ENVIRONMENT=readonly # Database configuration MCP_REGISTRY_DATABASE_URL=postgres://postgres:mysecretpassword@postgres:5432/mcp-registry?sslmode=disable # Path or URL to import seed data (supports local files and HTTP URLs) # For offline development, use: data/seed.json MCP_REGISTRY_SEED_FROM=/app/data/seed.json # Seeding: point to production feed for production cases, filtering using search query parameter #MCP_REGISTRY_SEED_FROM=https://registry.modelcontextprotocol.io/v0/servers?search= # true to validate seed data, or false to skip checks (useful when seeding custom JSON) MCP_REGISTRY_ENABLE_REGISTRY_VALIDATION=false # JWT configuration # This should be a 32-byte Ed25519 seed (not the full private key). Generate a new seed with: `openssl rand -hex 32` MCP_REGISTRY_JWT_PRIVATE_KEY=9c70753ea08347294c0676e931c45fc2fc887567e16438e7512731d2911f8a40 # Publish/auth aren't needed, disable them explicitly: MCP_REGISTRY_OIDC_ENABLED=false MCP_REGISTRY_ENABLE_ANONYMOUS_AUTH=false |
Preparing the seed data
The Model Context Protocol team provides a way to populate data on start of the container using the MCP_REGISTRY_SEED_FROM environment variable. It will read the file and seed the database with it. In combination with MCP_REGISTRY_ENABLE_REGISTRY_VALIDATION, it can validate that the seed data is valid.
The data should be in JSON format and be an array of MCP server objects as per the schema described by the JSON MCP server schema. Below is an example of seed data:
|
1 2 3 4 5 6 7 8 9 10 11 12 13 14 15 16 17 18 19 20 21 22 23 24 25 26 27 28 29 30 31 32 33 34 35 36 37 38 39 40 41 42 43 44 45 46 47 48 49 50 51 52 53 54 55 56 57 58 59 60 61 62 63 64 65 66 67 68 69 70 71 72 73 74 75 76 77 78 79 80 81 82 83 84 85 86 87 88 89 90 91 92 93 94 95 96 97 98 99 100 101 102 103 104 105 106 107 108 109 110 111 112 113 114 115 116 117 118 119 120 121 122 123 124 125 126 127 128 129 130 131 132 133 134 135 136 137 138 139 140 141 142 143 144 145 146 147 148 149 150 151 152 153 154 155 156 157 158 159 160 161 162 163 |
[ { "$schema": "https://static.modelcontextprotocol.io/schemas/2025-10-17/server.schema.json", "name": "com.microsoft/azure", "description": "All Azure MCP tools to create a seamless connection between AI agents and Azure services.", "title": "Azure MCP Server", "repository": { "url": "https://github.com/microsoft/mcp", "source": "github", "subfolder": "servers/Azure.Mcp.Server" }, "version": "2.0.0-beta.7", "websiteUrl": "https://azure.microsoft.com/", "packages": [ { "registryType": "npm", "registryBaseUrl": "https://registry.npmjs.org", "identifier": "@azure/mcp", "version": "2.0.0-beta.7", "transport": { "type": "stdio" }, "packageArguments": [ { "value": "server", "type": "positional" }, { "value": "start", "type": "positional" } ] }, { "registryType": "nuget", "identifier": "Azure.Mcp", "version": "2.0.0-beta.7", "transport": { "type": "stdio" }, "packageArguments": [ { "value": "server", "type": "positional" }, { "value": "start", "type": "positional" } ] } ], "_meta": { "io.modelcontextprotocol.registry/official": { "status": "active", "publishedAt": "2025-11-24T16:17:02.938828Z", "updatedAt": "2025-11-24T16:17:02.938828Z", "isLatest": true } } }, { "$schema": "https://static.modelcontextprotocol.io/schemas/2025-10-17/server.schema.json", "name": "com.microsoft/azure-devops-mcp", "title": "Azure DevOps MCP Server", "description": "Local MCP server for Azure DevOps—work items, repositories, pipelines, test plans, wiki, search, and more.", "websiteUrl": "https://github.com/microsoft/azure-devops-mcp", "repository": { "url": "https://github.com/microsoft/azure-devops-mcp", "source": "github" }, "version": "2.2.2", "packages": [ { "registryType": "npm", "registryBaseUrl": "https://registry.npmjs.org", "identifier": "@azure-devops/mcp", "version": "2.2.2", "runtimeHint": "npx", "transport": { "type": "stdio" }, "packageArguments": [ { "type": "positional", "valueHint": "organization", "description": "Azure DevOps organization name (e.g., 'contoso')", "isRequired": true } ] } ] }, { "$schema": "https://static.modelcontextprotocol.io/schemas/2025-10-17/server.schema.json", "name": "com.microsoft/microsoft-learn-mcp", "description": "Official Microsoft Learn MCP Server – real-time, trusted docs & code samples for AI and LLMs.", "title": "Microsoft Learn MCP", "repository": { "url": "https://github.com/MicrosoftDocs/mcp", "source": "github" }, "version": "1.0.0", "websiteUrl": "https://github.com/MicrosoftDocs/mcp", "remotes": [ { "type": "streamable-http", "url": "https://learn.microsoft.com/api/mcp" } ], "_meta": { "io.modelcontextprotocol.registry/official": { "status": "active", "publishedAt": "2025-11-21T06:16:59.721831Z", "updatedAt": "2025-11-21T06:16:59.721831Z", "isLatest": true } } }, { "$schema": "https://static.modelcontextprotocol.io/schemas/2025-10-17/server.schema.json", "name": "com.atlassian/atlassian-mcp-server", "description": "Connect to Jira and Confluence for issue tracking and documentation.", "version": "1.0.0", "remotes": [ { "type": "sse", "url": "https://mcp.atlassian.com/v1/sse" } ], "_meta": { "io.modelcontextprotocol.registry/official": { "status": "active", "createdAt": "2025-11-21T10:58:13.1934455+00:00", "updatedAt": "2025-11-21T10:58:18.6788839+00:00", "isLatest": true } } }, { "$schema": "https://static.modelcontextprotocol.io/schemas/2025-10-17/server.schema.json", "name": "io.github.github/github-mcp-server", "version": "1.0.0", "description": "Official GitHub Remote MCP Server offering the default toolset for GitHub integrations.", "websiteUrl": "https://github.com/github/github-mcp-server", "repository": { "url": "https://github.com/github/github-mcp-server", "source": "github" }, "remotes": [ { "type": "streamable-http", "url": "https://api.githubcopilot.com/mcp/" } ], "_meta": { "io.modelcontextprotocol.registry/publisher-provided": { "hostedBy": "GitHub", "docUrl": "https://raw.githubusercontent.com/github/github-mcp-server/main/docs/remote-server.md" } } } ] |
Running the registry container
To run the container you can now execute the Docker run command below:
|
1 2 3 4 5 |
docker run --name mcpregistry -p 8080:8080 -d ` --network mcp-net ` --env-file C:\temp\mcpregistry.env ` -v "path\to\mcp-allowed-servers-registry.json:/app/data/seed.json:ro" ` ghcr.io/modelcontextprotocol/registry:latest |
This will make the registry available at http://localhost:8080. You can query the servers by navigating to http://localhost:8080/v0.1/servers.
Accessing the registry container publicly
If you’ve completed the steps above, you now have a local MCP Registry ready for discovery. The next question is: how do you connect this to your GitHub Administrative UI?
Here’s the key: you’ll need a publicly accessible URL for your registry. This allows GitHub Copilot (and the IDEs) to discover and restrict to only the MCP servers you have configured in your registry.
In my case, I used Microsoft Dev Tunnel. This allowed me to create a tunnel from my development machine to the internet. See this as it is creating a proxy for me. To create the tunnel, you can use the following commands:
|
1 2 3 4 5 6 7 8 9 10 11 12 13 14 15 |
# login to the service, if not already done. devtunnel user login # Create a persistent tunnel in anonymous mode. Not doing so, you will require an access key to access the tunnel. # By default, tunnels expire after 30 days of no activity. Use the --expiration parameter to decrease the duration. Use h for hours and d for days. Minimum that you can set is 1 hour (1h) and the maximum you can set is 30 days (30d). devtunnel create mcp-registry --allow-anonymous # Get the tunnel-id devtunnel list # Associate the tunnel to the registry port 8080 for proxying devtunnel port create mcp-registry.use -p 8080 # Start the tunnel devtunnel host mcp-registry.use |
Once the tunnel is started, you can set the URL in the MCP Registry field in the GitHub Administration UI.
But Dom…
How I do add or delete servers once the registry is up and running?
When using the Model Context Protocol in read-only discovery mode, you can’t update servers directly. To make changes, you’d normally go through the publishing process, but since we’re not publishing packages here, you have a few options:
- Update the database manually
- Build your own interface
- Restart the container using the
MCP_REGISTRY_SEED_FROMenvironment variable, pointing to a data version that includes your updates (for example, newly added server versions).
Important note: If you leave this environment variable set, the next time the container starts, it will try to seed the data again, which can cause errors. So, make sure to remove or unset it after the initial update.
As usual, if you do believe there are better ways, do let me know, always happy to learn and share my findings with the community.
Happy MCP-ing!