CosmosDB linux container for your CI builds
If you have been following Microsoft Build 2021, you may have seen the news that the CosmosDB linux container is now out. This is great news for the ones who finally want to test on a *nix environment.
As of this post, the CosmosDB linux container is in preview. As stated in the documentation, there are some limitations:
We do not recommend use of the emulator (Preview) in production. For heavier workloads, use our Windows emulator.
Today, I will show you how you can automate the CosmosDB container for your CI builds, in particular Azure DevOps, running on Linux and Windows machines. If you plan to use the container on a machine running Windows, but using Docker Linux container mode, you will run into some Windows limitations while automating the process. Read more about that below.
Using the container on Windows build agents
As mentioned earlier, there are some limitations if you want to automate the creation of the containers on the fly on a Windows agent.
The CosmosDB linux container uses self-signed certificates to secure the connectivity to its endpoint. Once you start the container, a new self-signed Root CA certificate is created, and, using that Root CA certificate, a child certificate is created to secure the endpoint. This means that this Root CA certificate needs to be manually trusted each time the container is created (does not apply if the container is stopped and restarted).
The limitation you will run into is that, for security reasons, when you want to trust a self-signed certificate on Windows, you will get a security warning of the sort when trying to import this Root CA certificate into the CurrentUser/Root store.
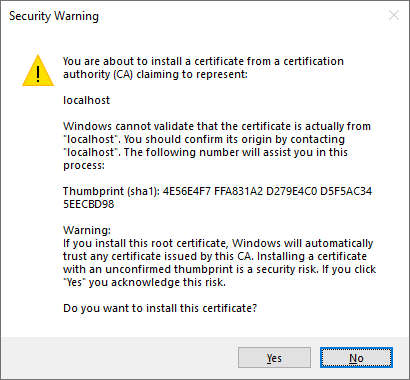
Unfortunately, it is impossible on Windows to bypass this security warning when installing the certificate to the CurrentUser/Root store. As stated this post, the popup is raised by a crypt32.dll library when calling CertAddCertificateContextToStore function and attempting to install the certificate to for instance, CurrentUser\Root store (other stores are not affected). This was made to prevent malicious applications to silently install certificates to current user’s trust store.
If you try to import the certificate to the LocalMachine/Root store (running administrator), you will not get the popup. If you are running your own agent, and the VSTS (azure devops) agent is setup with administrative access*, you will have access to the LocalMachine store and this will not be a problem.
*: You just need to make sure your build service account (which can be a local account, a domain account, or Local Service in a workgroup) also has administrative permission.
Configuring the container for Azure DevOps
As the CosmosDB SDK is, by default, using Direct connectivity mode, the CosmosDB container needs to have the IP of the machine overridden in its settings. Moreover, you will also need to trust the Root CA certificate.
Getting the IP address
Windows
To get the machine’s IP address, you can run the following in PowerShell. Replace the interfaceName with your interface name. You can get it by executing the Get-NetIpAddress cmdlet
|
1 2 |
$interfaceName = 'Ethernet 2' $ipAddress = Get-NetIpAddress | Where-Object { $_.InterfaceAlias -eq $interfaceName -and $_.AddressFamily -eq 'IPv4' } | Select-Object -ExpandProperty IpAddress |
Linux
|
1 |
ipAddress="ifconfig | grep "inet " | grep -Fv 127.0.0.1 | awk '{print $2}' | head -n 1" |
Starting the emulator
The container needs to setup its partitions before it can be used. As such you need to wait until the container is fully started. The following is an inline script that starts the container using PowerShell.
|
1 2 3 4 5 6 7 8 9 10 11 12 13 14 15 16 |
$containerId = (docker create -p 8081:8081 -p 10251:10251 -p 10252:10252 -p 10253:10253 -p 10254:10254 -m 3g --cpus=2.0 -e AZURE_COSMOS_EMULATOR_PARTITION_COUNT=10 -e AZURE_COSMOS_EMULATOR_ENABLE_DATA_PERSISTENCE=false -e AZURE_COSMOS_EMULATOR_IP_ADDRESS_OVERRIDE=$ipAddress mcr.microsoft.com/cosmosdb/linux/azure-cosmos-emulator) Write-Host "##vso[task.setvariable variable=cosmosDbContainerId]$containerId" docker start $containerId Start-Sleep -Seconds 5 $isStarted = $false while ($isStarted -eq $false) { $logs = (docker logs $containerId) if ($logs.Contains('Started')) { Write-Output "Container $containerId started." $isStarted = $true break; } Write-Output "Waiting for container $containerId to start" Write-Verbose ($logs | Out-String) Start-Sleep -Seconds 5 } |
As you can realize in the script, I keep track of the containerId generated with a variable. Set isOutput=true if you want to use it in another job/stage.
Trusting the Root CA certificate
Windows
If you want to add the certificate to the LocalMachine/Root store, you will need administrator privileges as mentioned above.
|
1 2 3 4 |
curl -k https://$ipAddress:8081/_explorer/emulator.pem > "$(Agent.TempDirectory)/emulatorcert.crt" $cert = Import-Certificate -FilePath "$(Agent.TempDirectory)/emulatorcert.crt" -CertStoreLocation Cert:\LocalMachine\Root (Get-ChildItem -Path "Cert:\LocalMachine\Root\$($cert.Thumbprint)").FriendlyName = 'CosmosDB Linux Docker container Root CA <CI-Build-Number>' Write-Host "##vso[task.setvariable variable=rootCAThumbprint]$cert.Thumbprint" |
Replace <CI-Build-Number> with your CI build number. This will help in case you need to cleanup stuff that are lingering/not needed anymore. If you aren’t using this for your CI build, you can remove this.
Note: as mentioned above, if you are adding it to CurrentUser/Root store, you will get a popup. This will not work in an automated environment.
Linux
The certificate can be copied to the folder that contains custom certificates in the Linux distribution. Commonly on Debian distributions, it is located on /usr/local/share/ca-certificates/.
|
1 2 3 |
curl -k https://$ipAddress:8081/_explorer/emulator.pem > $(Agent.TempDirectory)/emulatorcert.crt sudo cp $(Agent.TempDirectory)/emulatorcert.crt /usr/local/share/ca-certificates/ update-ca-certificates |
Stopping the emulator
Stopping the emulator is as easy as running docker rm -f $(variables.containerId). You can have a script task that wraps that command.
To remove the certificate, you can execute the following command
Linux: rm -f /usr/local/share/ca-certificates/emulatorcert.crt
Windows: Get-ChildItem -Path Cert:\LocalMachine\Root\$(rootCAThumbprint) | Remove-Item -Force
Task example
The following are examples on how to accomplish the initial steps, the start and stop of the container.
Linux
|
1 2 3 4 5 6 7 8 9 10 11 12 13 14 15 16 17 18 19 20 21 22 23 24 25 26 27 28 29 30 31 32 33 34 35 36 37 38 39 40 41 |
- task: PowerShell@2 name: startCosmosDb displayName: 'Start Azure Cosmos DB emulator' inputs: pwsh: true targetType: inline script: | $ipAddress = (hostname -I | awk '{print $1}') $containerId = (docker create -p 8081:8081 -p 10251:10251 -p 10252:10252 -p 10253:10253 -p 10254:10254 -m 3g --cpus=2.0 -e AZURE_COSMOS_EMULATOR_PARTITION_COUNT=10 -e AZURE_COSMOS_EMULATOR_ENABLE_DATA_PERSISTENCE=false -e AZURE_COSMOS_EMULATOR_IP_ADDRESS_OVERRIDE=$ipAddress mcr.microsoft.com/cosmosdb/linux/azure-cosmos-emulator) Write-Host "##vso[task.setvariable variable=cosmosDbContainerId]$containerId" docker start $containerId Start-Sleep -Seconds 5 $isStarted = $false while ($isStarted -eq $false) { $logs = (docker logs $containerId) if ($logs.Contains('Started')) { Write-Output "Container $containerId started." $isStarted = $true break; } Write-Output "Waiting for container $containerId to start" Write-Verbose ($logs | Out-String) Start-Sleep -Seconds 5 } - script: | ipAddress=$(hostname -I | awk '{print $1}') curl -k https://$ipAddress:8081/_explorer/emulator.pem > $(Agent.TempDirectory)/emulatorcert.crt sudo cp $(Agent.TempDirectory)/emulatorcert.crt /usr/local/share/ca-certificates/ sudo update-ca-certificates echo "##vso[task.setvariable variable=cosmosDbEndpoint]https://$ipAddress:8081" displayName: 'Prepare emulator' # add your other tasks that uses cosmosDb here. # you can use the variable $(cosmosDbEndpoint) for the endpoint as a convenience factor - script: | if [ ! -z "$(cosmosDbContainerId)" ]; then docker rm -f $(cosmosDbContainerId) sudo rm -f /usr/local/share/ca-certificates/emulatorcert.crt fi displayName: 'Clean Azure Cosmos DB emulator' condition: always() |
Windows
|
1 2 3 4 5 6 7 8 9 10 11 12 13 14 15 16 17 18 19 20 21 22 23 24 25 26 27 28 29 30 31 32 33 34 35 36 37 38 39 40 41 |
- task: PowerShell@2 name: startCosmosDb displayName: 'Start Azure Cosmos DB emulator' inputs: pwsh: true targetType: inline script: | $containerId = (docker create -p 8081:8081 -p 10251:10251 -p 10252:10252 -p 10253:10253 -p 10254:10254 -m 3g --cpus=2.0 -e AZURE_COSMOS_EMULATOR_PARTITION_COUNT=10 -e AZURE_COSMOS_EMULATOR_ENABLE_DATA_PERSISTENCE=false -e AZURE_COSMOS_EMULATOR_IP_ADDRESS_OVERRIDE=$ipAddress mcr.microsoft.com/cosmosdb/linux/azure-cosmos-emulator) Write-Host "##vso[task.setvariable variable=cosmosDbContainerId]$containerId" docker start $containerId Start-Sleep -Seconds 5 $isStarted = $false while ($isStarted -eq $false) { $logs = (docker logs $containerId) if ($logs.Contains('Started')) { Write-Output "Container $containerId started." $isStarted = $true break; } Write-Output "Waiting for container $containerId to start" Write-Verbose ($logs | Out-String) Start-Sleep -Seconds 5 } - task: PowerShell@2 name: startCosmosDb displayName: 'Prepare emulator' inputs: pwsh: true targetType: inline script: | curl -k https://$ipAddress:8081/_explorer/emulator.pem > "$(Agent.TempDirectory)/emulatorcert.crt" $cert = Import-Certificate -FilePath "$(Agent.TempDirectory)/emulatorcert.crt" -CertStoreLocation Cert:\LocalMachine\Root (Get-ChildItem -Path "Cert:\LocalMachine\Root\$($cert.Thumbprint)").FriendlyName = 'CosmosDB Linux Docker container Root CA <CI-Build-Number>' Write-Host "##vso[task.setvariable variable=rootCAThumbprint]$cert.Thumbprint" Write-Host "##vso[task.setvariable variable=cosmosDbEndpoint]https://$ipAddress:8081" # add your other tasks that uses cosmosDb here. # you can use the variable $(cosmosDbEndpoint) for the endpoint as a convenience factor - script | docker rm -f $(cosmosDbContainerId) Get-ChildItem -Path Cert:\LocalMachine\Root\$(rootCAThumbprint) | Remove-Item -Force displayName: 'Clean Azure Cosmos DB emulator' |