
Connecting to SharePoint Online CSOM using a non-interactive, headless application, through user delegation
It may happen to you that you need to run a process which has no user interaction for automation purposes. This may be a console application or an Azure Function that has a timer trigger. How is it possible to call the CSOM (client side object model) API of SharePoint online in such fashion? Usually people authenticate in other ways. Today, I want to show you how this can be done, using a .NET Core console application.
Preface
Before getting cracking with the code, I want to brush on the the On-Behalf-Flow, as it is important to understand it to understand why the code does certain things.
The OAuth 2.0 On-Behalf-Of flow (OBO) serves the use case where an application invokes a service/web API, which in turn needs to call another service/web API. The idea is to propagate the delegated user identity and permissions through the request chain1.

The application uses delegated permissions to access the underlying service. Those are configured in the API permissions in the (Azure Active Directory) application. A delegated permission allows an application in Azure Active Directory to perform actions on behalf of a particular user, where as, an application permission allows an application to act as its own entity/identity.
The downstream service, in our case, is the SharePoint Online REST API.
What you are probably familiar with, is that when you are trying to access an application, you are redirected to the login page, so you physically sign-in, or enter your username/password, and you are redirected to the application you are trying to access. The application has your identity (token) and can then make calls to the downstream service on your behalf (as shown in the diagram above).
What we’re trying to accomplish here, is access that downstream service (or the SharePoint API REST API) using an identity, but the calls are done through a headless, non-interactive application, such as, as I mentioned, a console application or an Azure Function using a timer trigger. You have no physical authentication interaction here. Why is this important? It is because such processes are actually often used in automation. Obviously you can tell me: but Dom, why don’t you use the client_credentials grant (authentication from backend to backend or application to application), where an application can have its own identity and query the downstream service? Well it comes down to permissions. Application permissions are wide. You may only want to grant the Site.Read permission to your application (through delegation), but an application permission offers us the Sites.Read.All, as the Sites.Read permission is not available for applications, only for delegation.
The user may have a lot more permissions assigned to him, but when going through the application, using delegation, those will be streamlined to what the application has been allowed to consume. For instance, a user may have the Microsoft Graph Sites.ReadWrite.All permission from his own identity, but if an application is configured with the Microsoft Graph Sites.Read.All delegated permission, the application will not be able to “write” on-behalf-of the user.
Let’s code!
To be able to demonstrate this concept, I will create a .NET Core console application and install the following NuGet packages:
- Microsoft.Identity.Client
- System.IdentityModel.Tokens.Jwt
- Microsoft.SharePointOnline.CSOM. This library is the library that targets .NET Standard, which can thus be consumed in a .NET Core (.NET 5) application.
Authentication Manager
The .NET Framework version of the SharePointOnline library provided us with an AuthenticationManager to deal with authentication. However, in the library above, they do not provide it. Microsoft gave a sample Authentication Manager in the library documentation. Lets use it as a base to get a head start.
Create a class named SPOAuthenticationManager and copy the code from the documentation. The class is thread safe and thus can be setup as a singleton (i.e. you can keep 1 instance in your application).
The key here is that we will need to replace the GetContext and AcquireTokenAsync methods. We also will change the cache key (and adapt the cache methods) so that each context is bounded per user per SharePoint tenant.
Replacing the GetContext method
Replace the GetContext method with the following code:
|
1 2 3 4 5 6 7 8 9 10 11 12 13 14 15 |
public ClientContext GetContext(Uri web, string clientId, string clientSecret, string tenantId, string appScope, string userName, string password) { var context = new ClientContext(web); var resourceUri = new Uri($"{web.Scheme}://{web.DnsSafeHost}"); async Task<string> AcquireTokenAsyncFunc(string clientIdFunc, string tenantIdFunc) => await AcquireTokenAsync(resourceUri, clientIdFunc, clientSecret, tenantIdFunc, appScope, userName, password); context.ExecutingWebRequest += (sender, e) => { var cacheKey = $"{web.DnsSafeHost}_{userName}"; string accessToken = EnsureAccessTokenAsync(resourceUri, cacheKey, clientId, tenantId, AcquireTokenAsyncFunc).GetAwaiter().GetResult(); e.WebRequestExecutor.RequestHeaders["Authorization"] = $"Bearer {accessToken}"; }; return context; } |
What this code does is for each context, before sending the request, it will go and grab the necessary access token for the user, that was issued through delegation (on-behalf-of). It also creates a delegate for the AcquireTokenAsync which can have many overloads. See my article on authenticating a service principal with a X509Certificate on how we can overload this!
Replacing the AcquireTokenAsync method
Replace the AcquireTokenAsync method with the following code:
|
1 2 3 4 5 6 7 8 9 10 11 12 13 14 15 16 17 18 19 20 21 22 |
private async Task<string> AcquireTokenAsync(Uri resourceUri, string clientId, string clientSecret, string tenantId, string appScope, string userName, string password) { string[] spScopes = new string[] { $"{resourceUri.Scheme}://{resourceUri.DnsSafeHost}/.default" }; string[] appScopes = new string[] { appScope }; var pubApp = PublicClientApplicationBuilder .Create(clientId) .WithTenantId(tenantId) .Build(); var pubResult = await pubApp.AcquireTokenByUsernamePassword(appScopes, userName, new NetworkCredential(string.Empty, password).SecurePassword).ExecuteAsync(); var userToken = pubResult.AccessToken; var userAssertion = new UserAssertion(userToken); var app = ConfidentialClientApplicationBuilder .Create(clientId) .WithTenantId(tenantId) .WithClientSecret(clientSecret) .Build(); var result = await app.AcquireTokenOnBehalfOf(spScopes, userAssertion).ExecuteAsync(); return result.AccessToken; } |
This is the exciting piece. In this piece of code, we acquire a token for the user using the Resource Owner Password Credential Flow. Once that is done, we exchange it to an application token through the Bearer JWT Flow (On-Behalf-Of) requesting access to the SharePoint Online Rest API service.
Other code considerations
The EnsureAccessTokenAsync method needs to also be changed. You will need to change that as well.
|
1 2 3 4 5 6 7 8 9 |
Task<string> EnsureAccessTokenAsync(Uri resourceUri, string cacheKey, string clientId, string tenantId, Func<string,string,Task<string>> acquireTokenAsyncFunc) { .... // getting the accessToken needs to be changed as well string accessToken = await acquireTokenAsyncFunc(clientId,tenantId).ConfigureAwait(false); .... } |
You will also need to change the signature of the *Cache methods to change the cache key from the resourceUri to the string cacheKey:
|
1 2 3 |
TokenFromCache(string cacheKey, ConcurrentDictionary<string, string> tokenCache) { ... } AddTokenToCache(string cacheKey, ConcurrentDictionary<string, string> tokenCache, string newAccessToken) { ... } RemoveTokenFromCache(string cacheKey, ConcurrentDictionary<string, string> tokenCache) { ... } |
Configuring the Azure AD Application
Now to be able to do the delegation we need to configure the Azure Active Directory application.
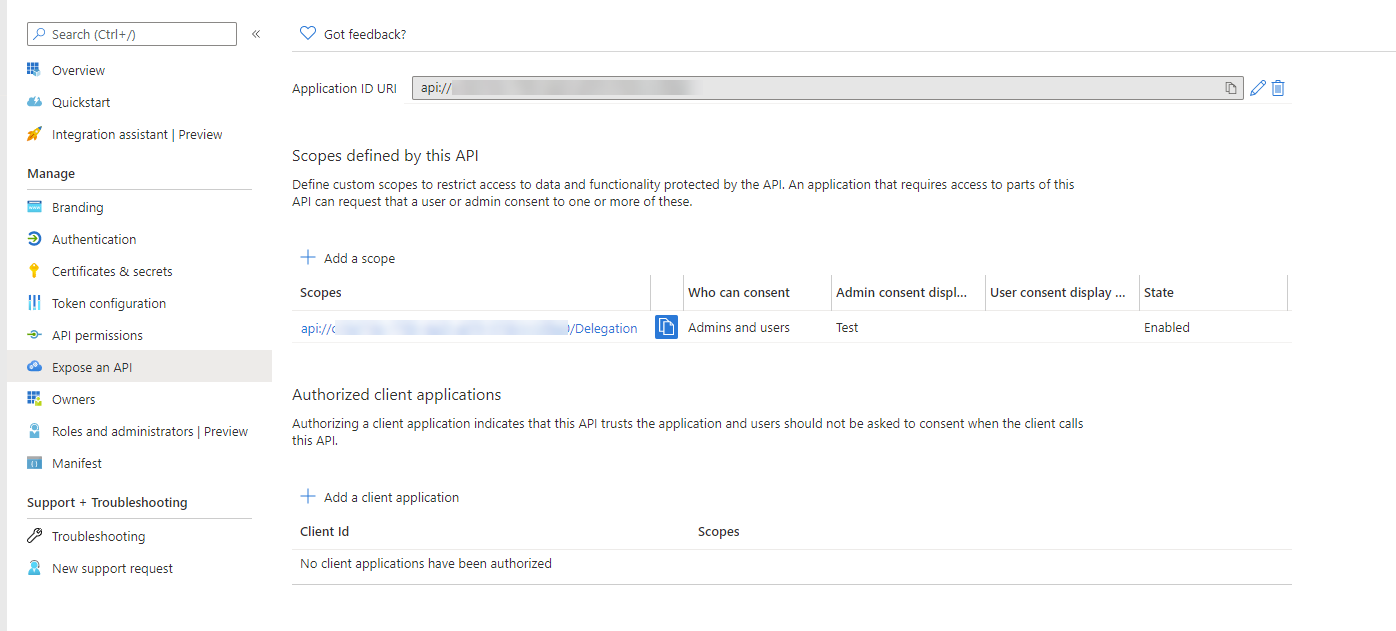
Make sure your application has an This will be important for the scopes portion. In my case, I chose to set it up with api://<my_application_id>
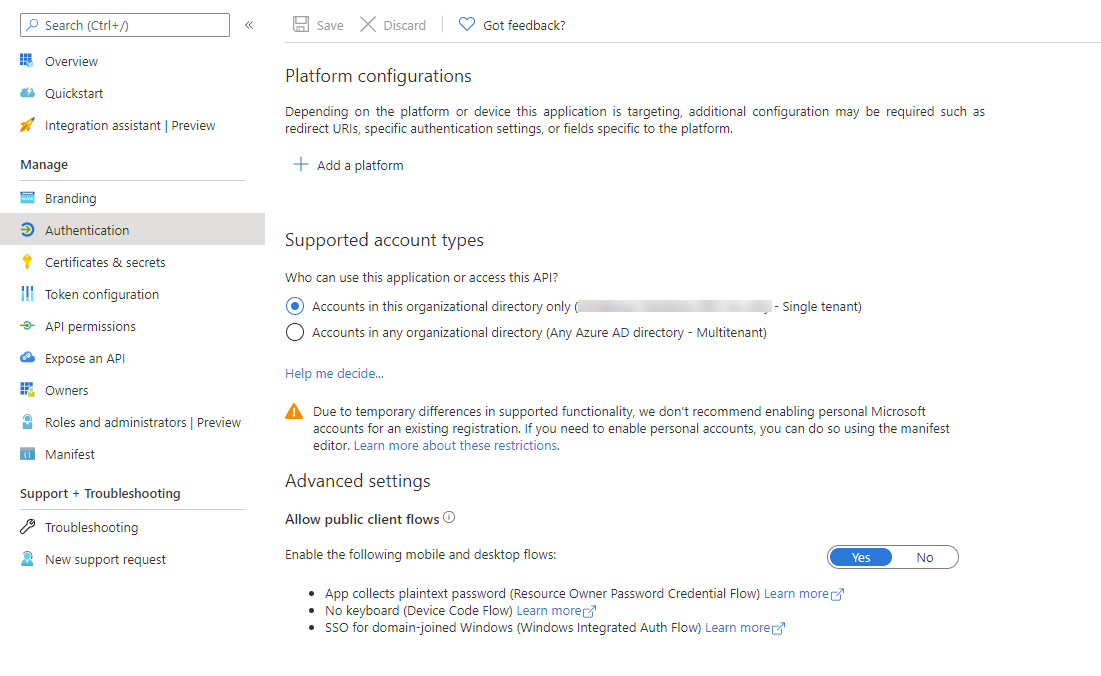
Also make sure that your application allows public clients. This is important to use the Resource Owner Password Credential grant flow.
Setting up the permissions
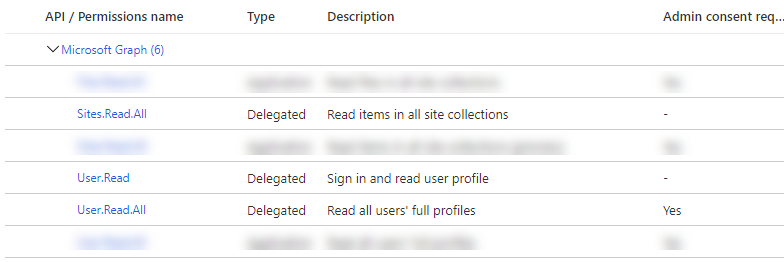
Configure the delegated permissions you need in the API permissions blade. Here’s an example:
Adding an application scope
To be able to delegate, the user, when using the Resource Owner Password Credential Flow, needs to request access to our application. In order to do that, it needs to request a scope. Create a new scope in the Expose an API blade. Here’s an example:
Setting up our console application
Now that we have the authentication manager for the ClientContext, we can consume the SharePoint CSOM:
|
1 2 3 4 5 6 7 8 9 10 11 12 13 14 15 16 17 |
var tenantId = "<tenant_id>"; var clientId = "<app_id>"; var clientSecret = "<app secret>"; var appScope = "<the_api_scope_you_created_in_the_application>"; var userName = "<user_principal_name>"; var password = "<value>"; var siteUrl = new Uri("https://<tenantName>.sharepoint.com/sites/<site_name>"); using (var cc = new SPOAuthenticationManager().GetContext(siteUrl, clientId, clientSecret, tenantId, appScope, userName, password)) { Console.WriteLine("Using user on-behalf-of"); cc.Load(cc.Web, p => p.Title); await cc.ExecuteQueryAsync(); Console.WriteLine(cc.Web.Title); }; |
Replace the variables values with your proper values.
After running the console application, you should be able to see the title of your site.
Considerations
If you are using this in an Azure Function V3 C#, you may get into a problem with the package System.IdentityModel.Tokens.Jwt. There’s an issue about this that has been opened on the SDK side. The workaround is to add the following in the property to your project: <_FunctionsSkipCleanOutput>true</_FunctionsSkipCleanOutput>