
End to End SSL solution using Web Apps and Azure Application Gateway multisite hosting
High performance and security (amongst other things) are the 2 non-functional requirements that usually first come to mind when we design an infrastructure architecture for the applications we develop. The usual 2 concepts that pop up with these 2 requirements are load balancing and firewalls. How can you easily achieve and check these 2 concepts when you are developing your architecture in Azure? One component that you can use for this is the Azure Application Gateway.
Azure Application Gateway is a web traffic load balancer (OSI layer 7 load balancer) that enables you to manage traffic to your web applications.
Some of its features include (but not limited to):
- URL-based routing: make routing decisions based on additional attributes of an HTTP request, such as URI path or host headers. For example, you can route traffic based on the incoming URL. So if /images is in the incoming URL, you can route traffic to a specific set of servers (known as a pool) configured for images. If /video is in the URL, that traffic is routed to another pool that’s optimized for videos
- Multiple-site hosting: enables you to configure more than one web site on the same application gateway instance
- Redirection: redirect traffic received at one listener to another listener or to an external site
- Session affinity (sticky sessions): keep a user session on the same server
- Websocket and HTTP/2 traffic: provides native support for the WebSocket and HTTP/2 protocols
- Azure Kubernetes Service (AKS) Ingress controller: Application Gateway Ingress controller runs as a pod within the AKS cluster and allows Application Gateway to act as ingress for an AKS cluster (*v2 only and currently in preview as the time of writing)
- HTTP headers rewrite: supports the capability to add, remove, or update HTTP request and response headers, while the request and response packets move between the client and back-end pools. It also provides you with the capability to add conditions to ensure the specified headers are rewritten only when certain conditions are met
- Custom error pages: create custom error pages instead of displaying default error pages
- SSL/TLS termination: allow unencrypted traffic between the application gateway and the backend servers saving some of the processing load needed to encrypt and decrypt said traffic
It also includes a Web Application Firewall (WAF) that provides centralized protection of your web applications from common exploits and vulnerabilities, such as sql injection and xss attacks. It is based on the Core Rule Set (CRS) 3.0 or 2.2.9 from the Open Web Application Security Project (OWASP).
In this post, we will dive into a more complex Azure component that may afraid many but once understood is a pleasure to work with. I will be showing you how to deploy the Azure Application Gateway through multiple site hosting with end-to-end (E2E) SSL using custom domains. I will be configuring 2 hostnames (subdomains), sd1.test.com and sd2.test.com and make them talk to their respective App Service setup. Both App Services are secured through SSL using lets encrypt certificates.
Azure Application Gateway comes in 2 versions as of today: version 1 and version 2. Version 2 is an upgrade on version 1 and includes features/enhancements such as an improvement in performance and a static public IP address. Read up on the version 2 new features here.
As the time of writing, version 2 is not available in all regions. For this demo, I will be using Azure Application Gateway v2 located in the East US region.
Note: certain functionality and configuration are not available on the UI (at least with version 1), so I highly recommend you grab yourself a copy of the azure cli or powershell cmdlets for Azure to help you in this journey.
Note 2: The creation of the LetsEncrypt certificate is not part of this post.
The prerequisites
Associating the customs domains to the App Services
In order to achieve E2E SSL, we need to first associate our subdomains to each of our App Service. To associate a domain to the App Service, navigate to the custom domains blade. Click Add custom domain and follow the instructions. I decided to validate my domain using DNS (CNAME).
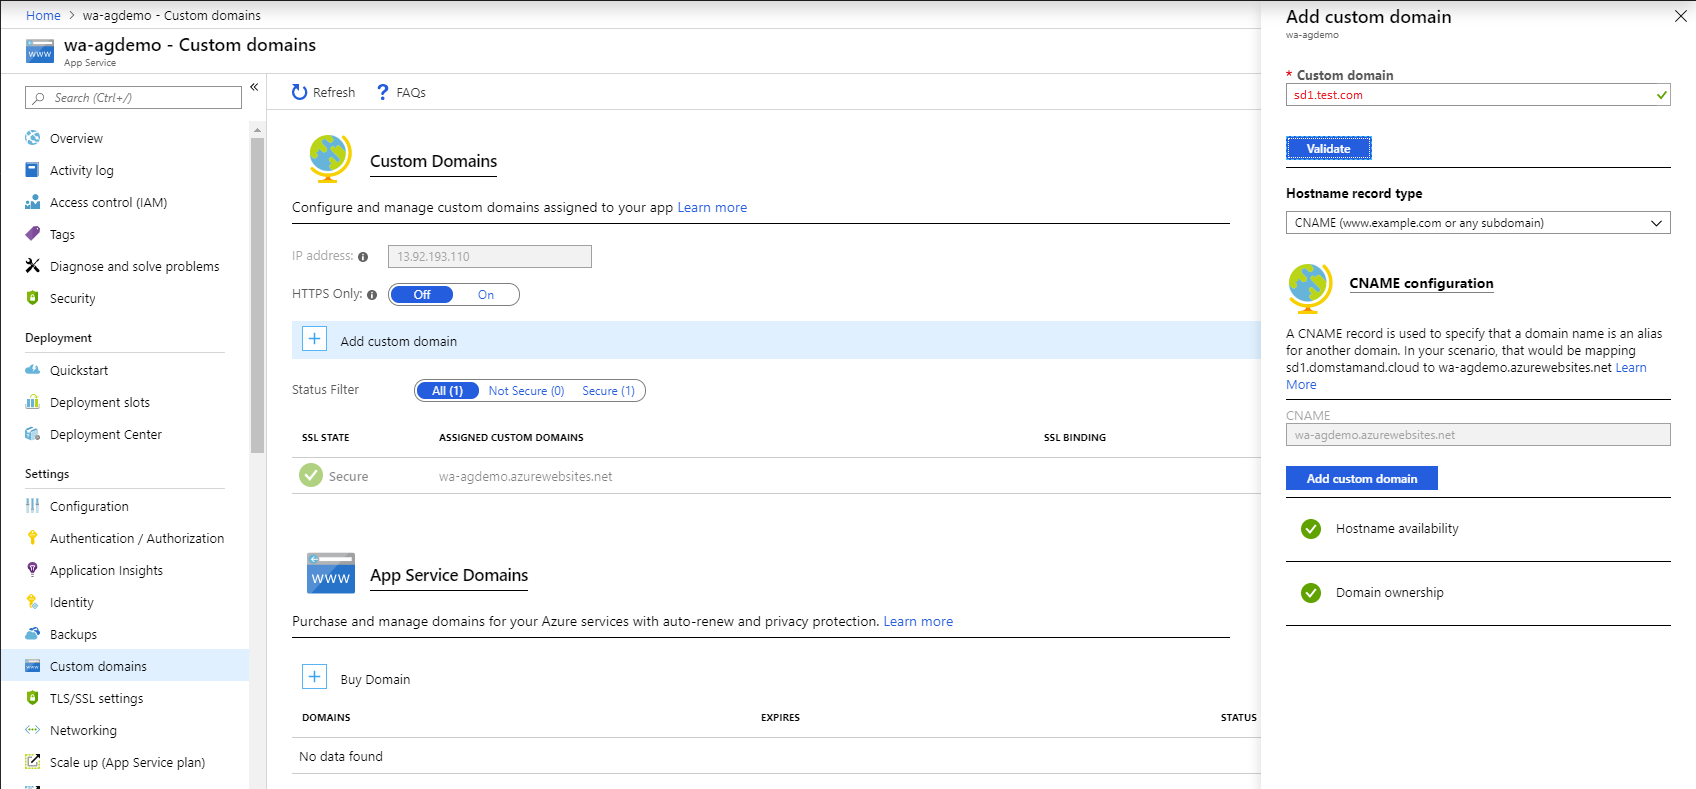
Azure App Service custom domain association
Associating the SSL certificate of each subdomain to each App Service
To associate the SSL certificate to the subdomain in the App Service, in the same screen as above, after you have added the custom domain, click on add bindings next to your newly added domain. Once you’ve uploaded the certificate, associate it to your domain using SNI SSL type binding.
Note that you can also do the same thing by navigating to the TLS/SSL settings blade.
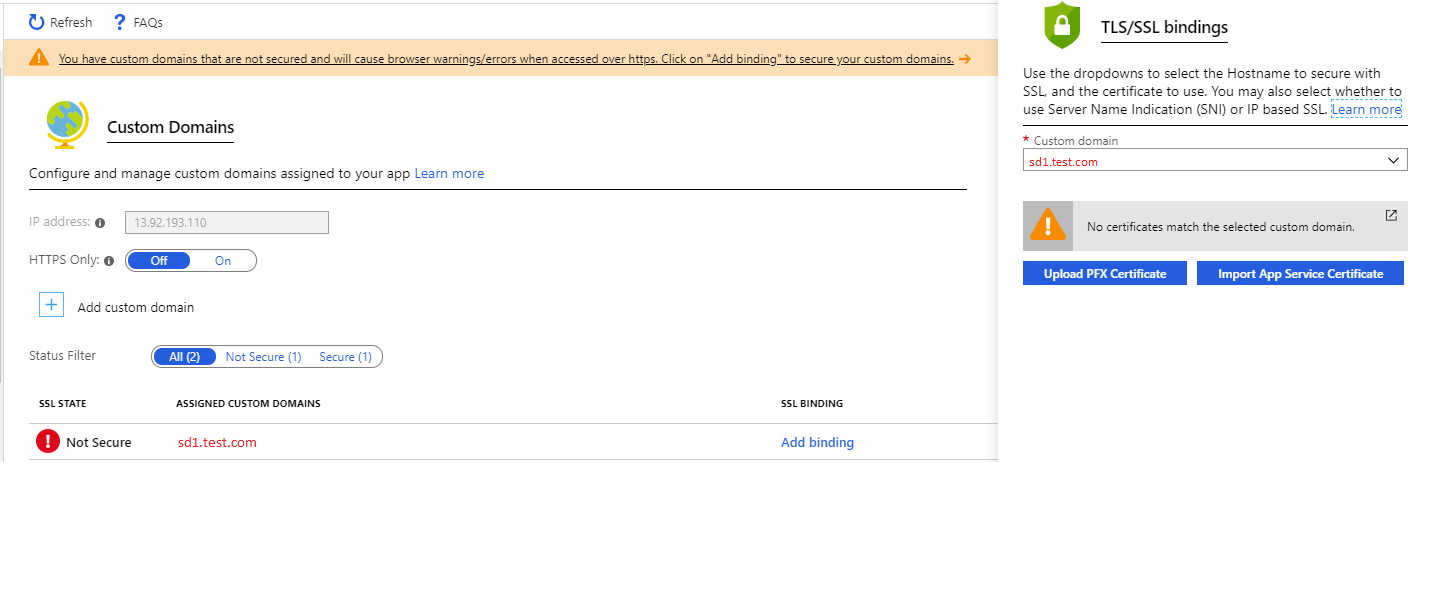
Azure App Service custom domain SSL bindings
The basics
The Application Gateway consists of multiple parts and in order to understand how to configure the Application Gateway you need to understand each of these parts and how they interact with each other. In other to explain the relationship each of these parts have with each other, I created the diagram below:
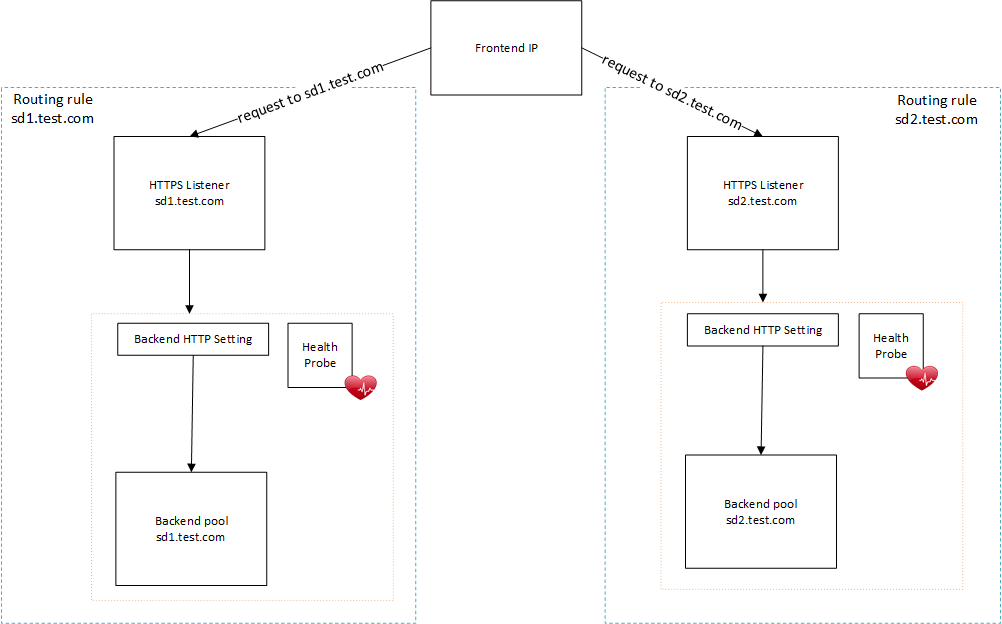
In a multiple hosting scenario, the frontend IP is the component that will be associated with your domains. This frontend IP uses a Public IP address resource to be able to map the underlying Public IP resource associated to the Application Gateway.
Once a request hits your frontend IP, it will inspect the hostname in the request and pass this request to the associated HTTP(S) listener mapped to the hostname.
The routing rule is what is necessary to tell the Application Gateway what to do with the incoming request, for instance, determine which HTTP listener to use, which backend pool to forward it to, etc. This rule can even do path based routing so that it can forward the request to an external site (or to your backend pool).
The backend HTTP setting component is responsible to control how to send the request to the backend pool, for instance what port to forward the request to, if the application should enable cookie-based affinity or not and so on.
The backend pool is where your request will land once it has been processed.
We cannot forget the health probe. The health probe is responsible to give the Application Gateway information about the health of your backend. If a server in your pool becomes unhealthy (i.e. the server goes down, or cannot be reached), the Application Gateway will not route the request to it. In the case that all servers in your backend become unhealthy, the Application Gateway will return a 502 error to the client.
The health probe lives attached to the backend HTTP settings.
Application Gateway setup
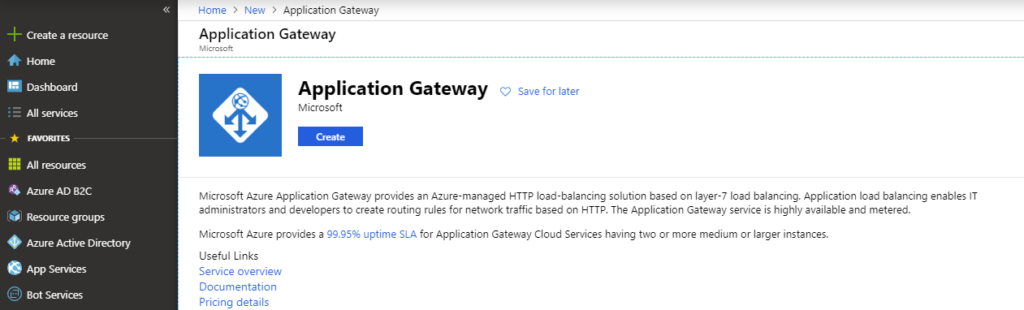
The first step is to create the Application Gateway Resource. In the Azure portal, click the Create a resource link in the sidebar, and then search for Application Gateway.
Azure Application Gateway creation overview
1 – The basics
The real first step, in creating the Application Gateway, is filling out the basics. This is where you will enter the Application Gateway name, configure the SKU, the scaling/# of instances, etc. As you can see, the Application Gateway requires a vNet. For Azure to communicate between the resources that you create, it needs a virtual network. The application gateway subnet can contain only application gateways. No other resources are allowed1. For the size of the subnet, Microsoft recommends that you use a subnet size of at least /28. This size gives you 11 usable IP addresses. If your application load requires more than 10 IP addresses, consider a /27 or /26 subnet size. See the documentation for more information on this topic.
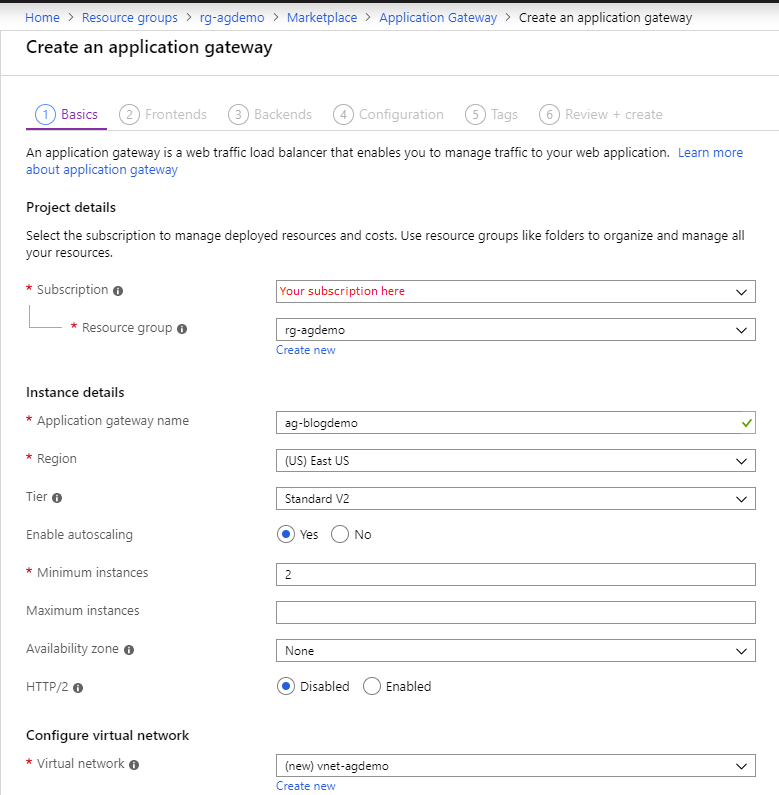
Azure Application Gateway creation step – basics
2 – The frontends
For the Application Gateway to be able to communicate with the outside world, we need to assign it an IP. Here you can create a new public IP resource
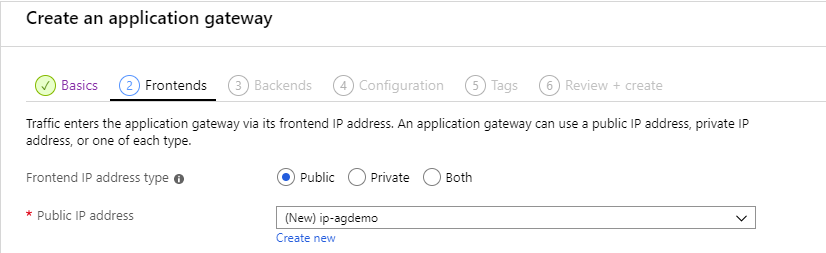
Azure Application Gateway creation step – Frontends
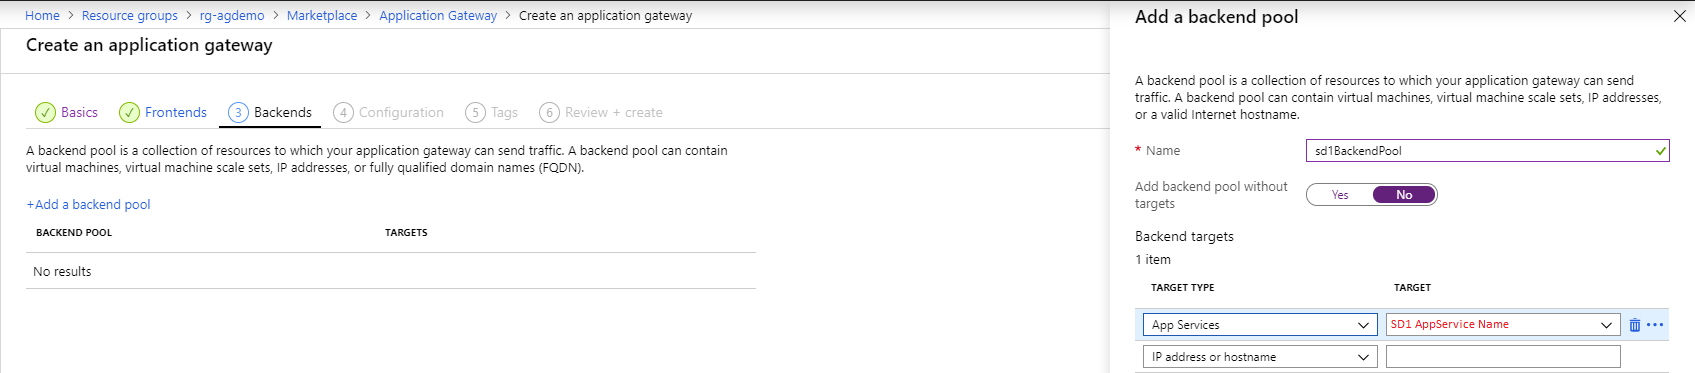
3 – The backends
The backend step is where you will add your App Services so that the requests can be routed there. To route to the App Services, select App Services in the target type and pick the respective App Service in the target combo box.
Azure Application Gateway creation step – backend #1

Azure Application Gateway creation step – backend #2
Azure Application Gateway creation step – backends summary
4 – The configuration (routing rules)
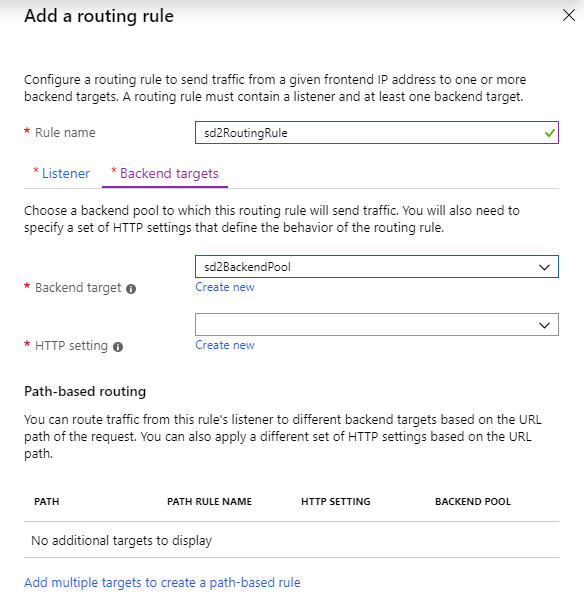
Now to tie everything together we need to add routing rules for each of our hostname that we want to handle, sd1.test.com and sd2.test.com. Each rule will be tied to a backend that we created previously.
4.1 – The listener configuration
Configure the listener that will take the requests that will come from sd1.test.com and sd2.test.com. For this you need 2 rules, each with HTTPS as the protocol. When asked to select the SSL certificate, upload your PFX associated for each of the domains. For the listener type, choose multiple sites, and in the hostname, be sure to put each of the hostnames as that’s how the Application Gateway will know which listener to invoke when a request will come through.
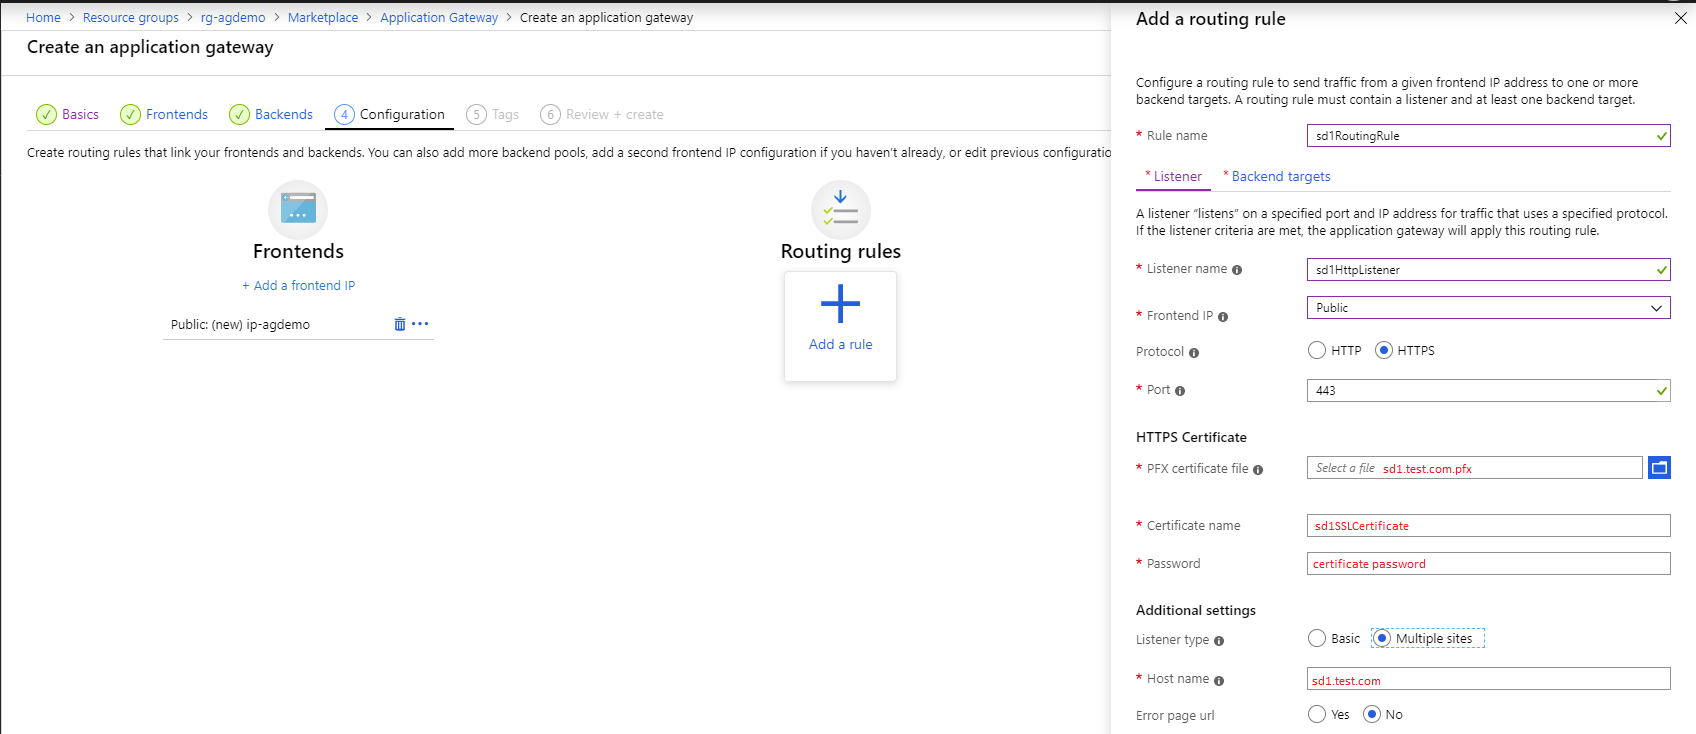
Azure Application Gateway creation step – routing rule configuration #1
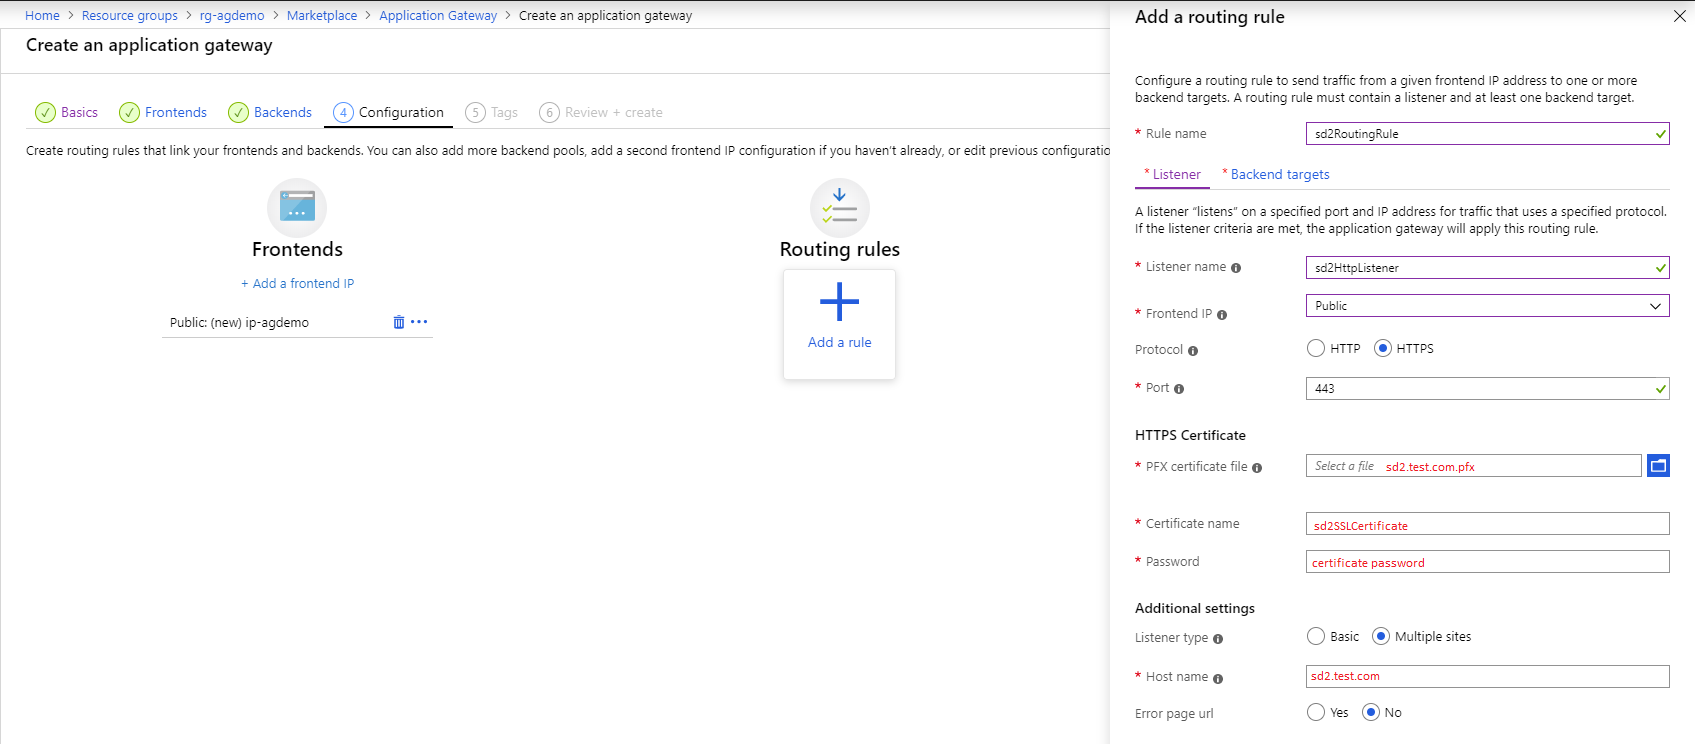
Azure Application Gateway creation step – routing rule configuration #2
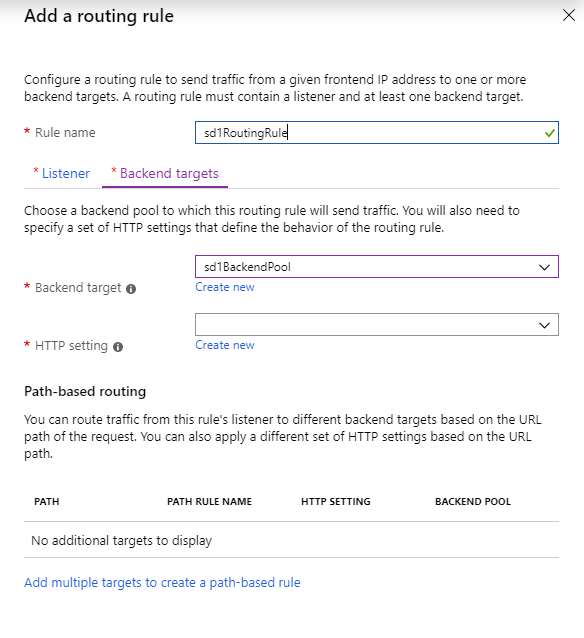
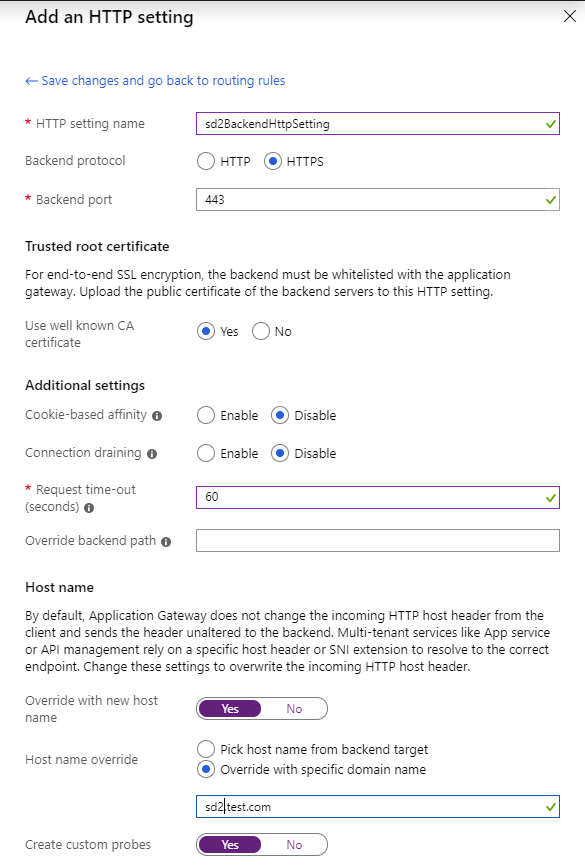
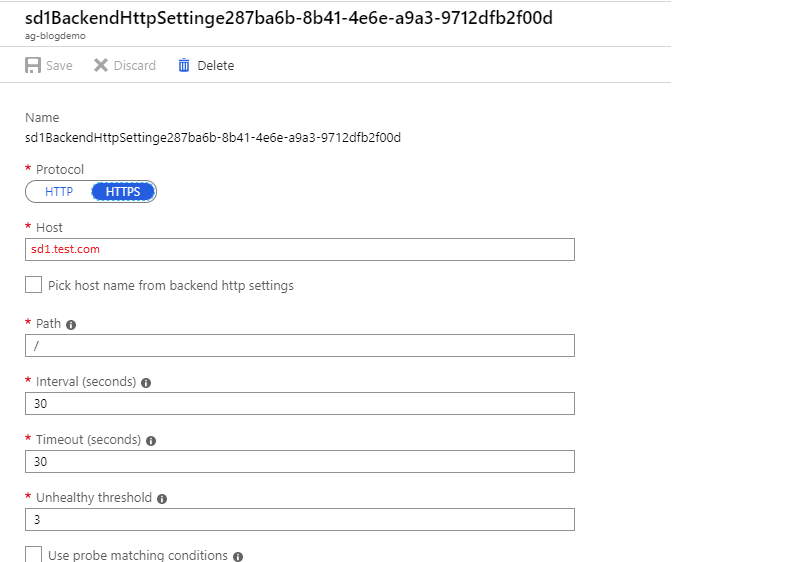
4.2 – The backend and backend http configuration
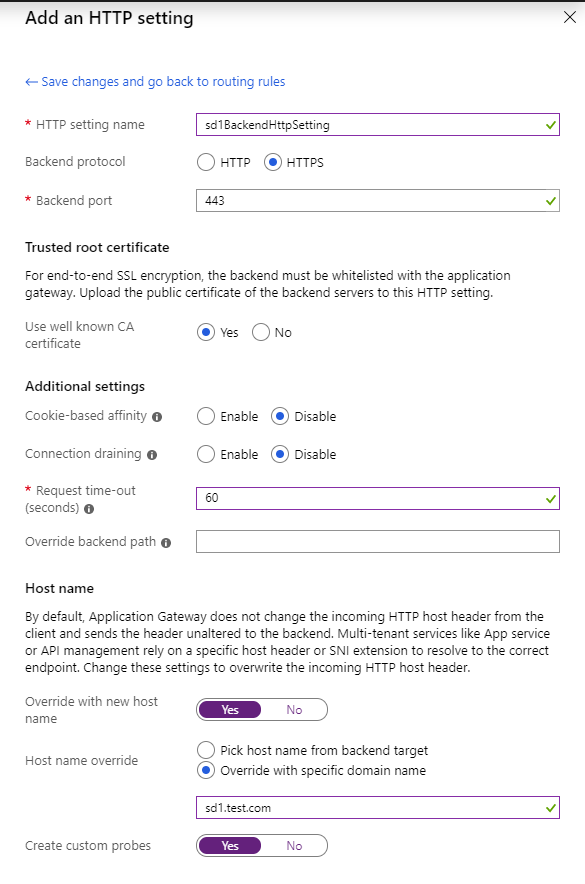
Each hostname’s routing rule require a backend pool and a HTTP backend setting to be associated to it. Be sure, in the HTTP Setting, to override the hostname to sd1.test.com and sd2.test.com respectively as as written, by default, Application Gateway does not change the incoming HTTP host header from the client and sends the header unaltered to the backend. Multi-tenant services
like App service or API management rely on a specific host header or SNI extension to resolve to the correct endpoint. Each hostname DNS will point to the Application Gateway. Since we added a custom domain to our App Service, the App Service will be able to pick up the request only if the host header is properly set.
A good practice also is to increase the request timeout to more than the default 20 seconds. This allows the Application Gateway to not timeout and return a 502 to your client, in the case, for instance, that your App Service is cold and booting and is not able to answer requests right away.
If your certificate is not in the well known CAs certificate, you have the choice to upload the public key of the certificate here. Note: if you are using Application Gateway version 1 you will need to upload your public certificate. Version 1 doesn’t have the notion of the well knowns unfortunately.
 Azure Application Gateway creation step – routing rule backend #1 |
 Azure Application Gateway creation step – routing rule http backend setting #1 |
 Azure Application Gateway creation step – routing rule backend #1 |
 Azure Application Gateway creation step – routing rule http backend setting #2 |
Updating the DNS records to point to our Application Gateway instance
In order for the hostnames sd1.test.com and sd2.test.com to always resolve to the Public IP, I will add a DNS name label to the Public IP resource. To do so, in the Public IP resource, navigate to the configuration blade and set the DNS name label.
Once you have done that, we can update the subdomains sd1.test.com and sd2.test.com to point to that DNS name. In this case, I will set the label to agdemo, and point the DNS to agdemo.eastus.cloudapp.azure.com
Test
Navigate to the subdomains sd1.test.com and sd2.test.com and you should be able to see the sites!
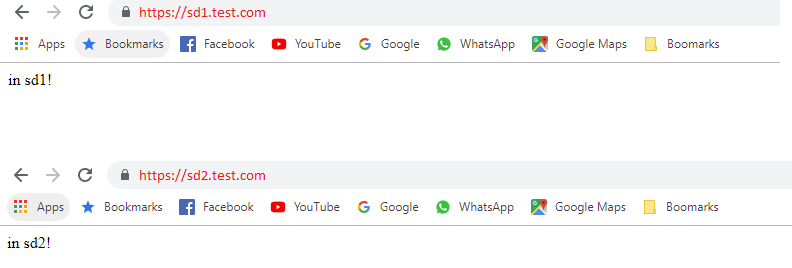
subdomains browsing
In order to really confirm that it works, you can go in the overview blade of the Application Gateway and you should see some graphs with some stats.
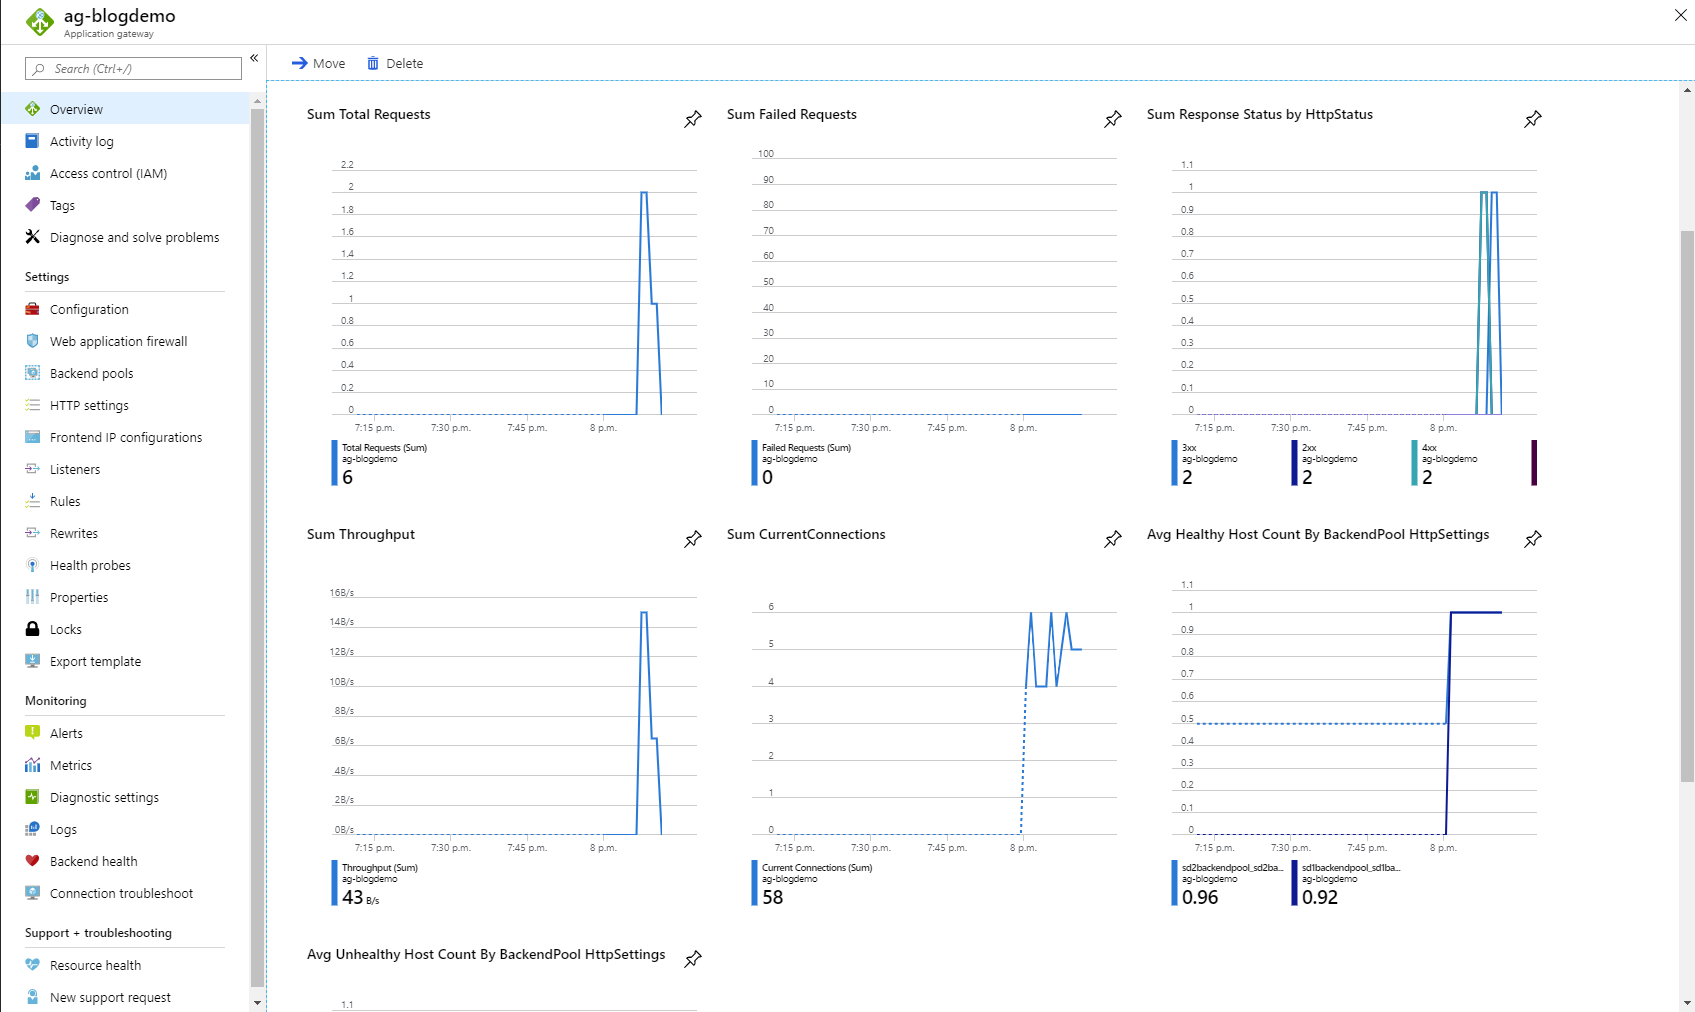
Application Gateway overview blade
Customizing the health probes (optional)
As you saw when we created the backend http settings, the option to create a custom probe to attach to each of our backend http setting was checked to yes. This created 2 unique health probes that each ping the subdomains to determine their health and report it to the Application Gateway (as shown in the picture below). However, the custom health probes set the host to the subdomains. This is not good because it creates a loopback to the Application Gateway. Instead, enter the App Service hostname here.
You can always customize the health probe by setting a path and customize which response status codes are acceptable for your backend to be healthy. For instance, if you have a healthcheck endpoint, you could always use that. You even have the possibility to enter a matching string that is located in the response body as well (no regex).
Application Gateway Backend Health Probe
Other considerations
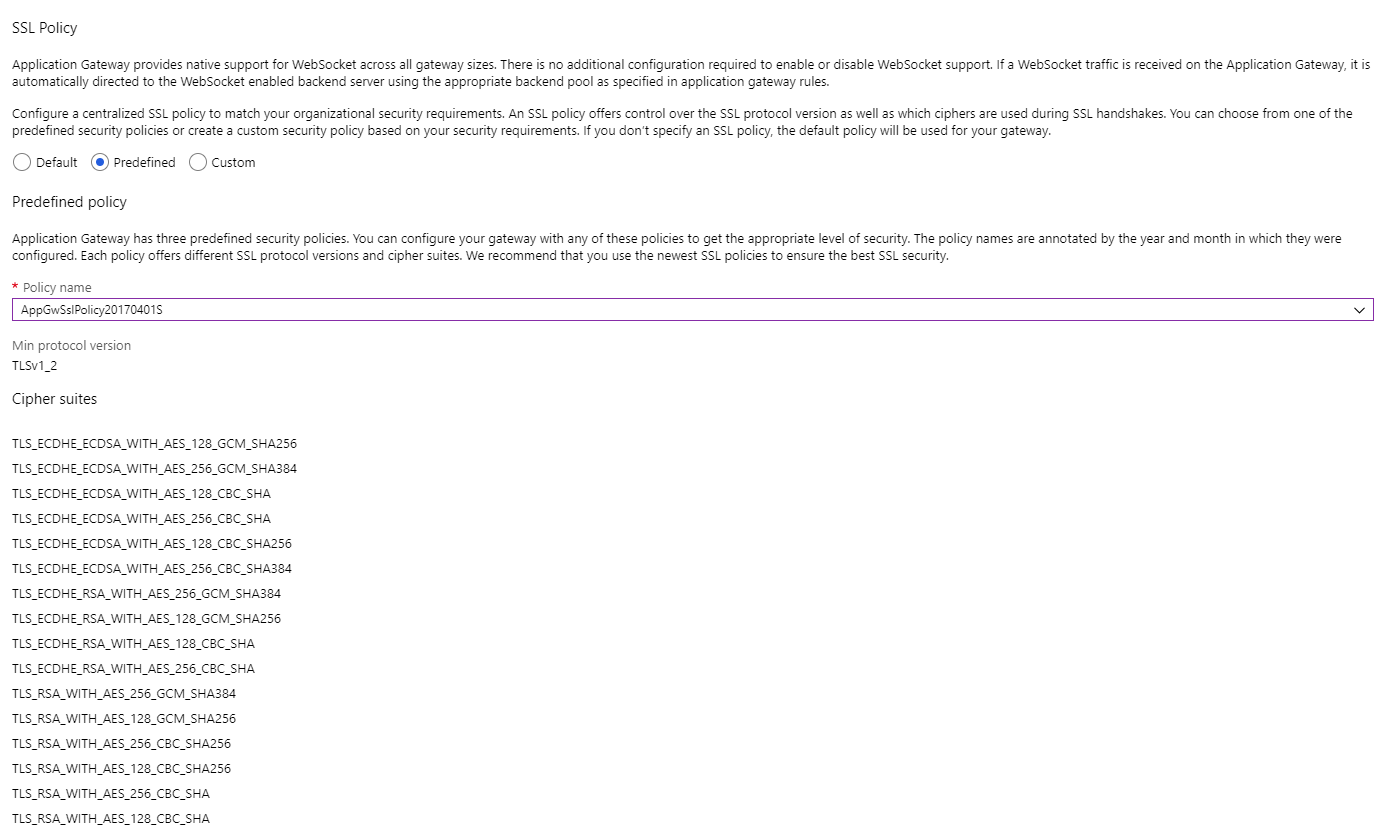
SSL Policy for HTTPS listeners
Since we are doing End-To-End SSL, to be more secure, I changed the SSL Policy to allow only TLS 1.2. Application Gateway comes with some predefined policies that you can use. You can even have custom SSL policies. To change the SSL policy, navigate to the listeners blade. Under the SSL policy section, pick predefined and select AppGwSslPolicy20170401S.
Application Gateway HTTP Listeners SSL Policy
Diagnostics
Application Gateway provides logs that you can use to manage and troubleshoot your running Application Gateway. Such logs are Activity logs, Access logs, Performance logs and Firewall logs. To understand more about those, I would definitely recommend you to read the documentation. The way I like to save those logs is through Log Analytics.
Scripting
If you want to automate the creation of the Application Gateway, there are a few ways to do so: you can use an ARM template, you can use the Azure CLI or you can use Azure PowerShell modules.
The PowerShell way
I’ve written the PowerShell script below that does all of the Portal steps above in case you prefer doing it through automation.
|
1 2 3 4 5 6 7 8 9 10 11 12 13 14 15 16 17 18 19 20 21 22 23 24 25 26 27 28 29 30 31 32 33 34 35 36 37 38 39 40 41 42 43 44 45 46 47 48 49 50 51 52 53 54 55 56 57 58 59 60 61 62 63 64 65 66 67 68 69 70 71 72 73 74 75 76 77 78 79 80 81 82 83 84 85 86 87 88 89 90 91 92 93 94 95 96 97 98 99 100 101 102 103 104 105 106 107 108 109 110 111 112 113 114 115 116 117 118 119 120 121 122 123 124 125 126 127 128 129 130 131 132 133 134 135 136 137 138 139 140 141 142 143 144 145 146 147 148 149 150 151 152 153 154 155 156 157 158 159 160 161 162 163 164 165 166 167 168 169 170 171 172 173 174 175 176 177 178 179 180 181 182 183 184 185 186 187 |
#Connect-AzConnect #Set-AzContext -Subscription SubscriptionName $ResourceGroupName = "rg-agdemo" $Location = "East US" $Sd1Hostname = "sd1.test.com" $Sd1WebAppFqdn = "webappsd1.azurewebsites.net" $Sd2Hostname = "sd2.test.com" $Sd2WebAppFqdn = "webappsd2.azurewebsites.net" $Sd1SSLCertificateFile = "sd1.test.com.pfx" $Sd1SSLCertificatePassword = ConvertTo-SecureString "p@ssw0rd!!" -AsPlainText -Force $Sd2SSLCertificateFile = "sd2.test.com.pfx" $Sd2SSLCertificatePassword = ConvertTo-SecureString "p@ssw0rd!!" -AsPlainText -Force $PublicIpDNSLabelName = "agdemo" # Create the vNet/subnet Write-Host "Creating vNet/subnet" $Subnet = New-AzVirtualNetworkSubnetConfig -Name AppGwSubnet -AddressPrefix "10.0.0.0/24" $VNet = New-AzvirtualNetwork -Name vnet-agdemo ` -ResourceGroupName $ResourceGroupName ` -Location $Location ` -AddressPrefix "10.0.0.0/16" ` -Subnet $Subnet $VNet = Get-AzvirtualNetwork -Name vnet-agdemo -ResourceGroupName $ResourceGroupName $Subnet = Get-AzVirtualNetworkSubnetConfig -Name $Subnet01 -VirtualNetwork $VNet Write-Host "Creating Gateway IP Configuration" $GatewayIPconfig = New-AzApplicationGatewayIPConfiguration -Name AppGwIpConfig -Subnet $Subnet # Create Public IP address Write-Host "Creating Public IP" $PublicIp = New-AzPublicIpAddress -ResourceGroupName $ResourceGroupName ` -Name ip-agdemo2 ` -Location $Location ` -AllocationMethod Static ` -DomainNameLabel $PublicIpDNSLabelName ` -Sku Standard # Create the frontend configuration (the component on which the Application Gateway listens on) Write-Host "Creating FrontEnd Configuration and port" $FrontEndIpConfig = New-AzApplicationGatewayFrontendIPConfig -Name AppGwPublicFrontendIp -PublicIPAddress $PublicIp $FrontEndPort = New-AzApplicationGatewayFrontendPort -Name AppGwFrontendPort -Port 443 # Create the sd1 backend pool Write-Host "Creating sd1 backend pool" $Sd1BackendPool = New-AzApplicationGatewayBackendAddressPool -Name sd1BackendPool -BackendFqdns $Sd1WebAppFqdn # Create the http backend settings Write-Host "Creating sd1 backend http settings" $Sd1HttpBackendSettings = New-AzApplicationGatewayBackendHttpSettings -Name sd1HttpBackendSettings ` -Port 443 ` -Protocol Https ` -CookieBasedAffinity Disabled ` -RequestTimeout 60 ` -HostName $Sd1Hostname # Create the sd2 backend pool Write-Host "Creating sd2 backend pool" $Sd2BackendPool = New-AzApplicationGatewayBackendAddressPool -Name sd2BackendPool -BackendFqdns $Sd2WebAppFqdn # Create the http backend settings Write-Host "Creating sd2 backend http settings" $Sd2HttpBackendSettings = New-AzApplicationGatewayBackendHttpSettings -Name sd2HttpBackendSettings ` -Port 443 ` -Protocol Https ` -CookieBasedAffinity Disabled ` -RequestTimeout 60 ` -HostName $Sd2Hostname # Create/Add the SSL certificates Write-Host "Creating sd1 ssl certificate" $Sd1SSLCertificate = New-AzApplicationGatewaySslCertificate -Name sd1SSLCertificate ` -CertificateFile $Sd1SSLCertificateFile ` -Password $Sd1SSLCertificatePassword Write-Host "Creating sd2 ssl certificate" $Sd2SSLCertificate = New-AzApplicationGatewaySslCertificate -Name sd2SSLCertificate ` -CertificateFile $Sd2SSLCertificateFile ` -Password $Sd2SSLCertificatePassword # Create the HTTPS Listeners Write-Host "Creating sd1 http listener" $Sd1HttpListener = New-AzApplicationGatewayHttpListener -Name sd1HttpListener ` -Protocol Https ` -FrontendIpConfiguration $FrontEndIpConfig ` -FrontendPort $FrontEndPort ` -HostName $Sd1Hostname ` -SslCertificate $Sd1SSLCertificate Write-Host "Creating sd2 http listener" $Sd2HttpListener = New-AzApplicationGatewayHttpListener -Name sd2HttpListener ` -Protocol Https ` -FrontendIpConfiguration $FrontEndIpConfig ` -FrontendPort $FrontEndPort ` -HostName $Sd2Hostname ` -SslCertificate $Sd2SSLCertificate # Create the routing rule Write-Host "Creating sd1 routing rule" $Sd1RoutingRule = New-AzApplicationGatewayRequestRoutingRule -Name sd1RoutingRule ` -RuleType basic ` -BackendHttpSettings $Sd1HttpBackendSettings ` -HttpListener $Sd1HttpListener ` -BackendAddressPool $Sd1BackendPool Write-Host "Creating sd2 routing rule" $Sd2RoutingRule = New-AzApplicationGatewayRequestRoutingRule -Name sd2RoutingRule ` -RuleType basic ` -BackendHttpSettings $Sd2HttpBackendSettings ` -HttpListener $Sd2HttpListener ` -BackendAddressPool $Sd2BackendPool # Create SSL Policy Write-Host "Creating ssl policy" $AppGwSslPolicy = New-AzApplicationGatewaySslPolicy -PolicyType Predefined -PolicyName AppGwSslPolicy20170401S Write-Host "Creating application gateway" $Sku = New-AzApplicationGatewaySku -Name "Standard_v2" -Tier Standard_v2 -Capacity 2 $AppGw = New-AzApplicationGateway -Name AppGwDemo ` -ResourceGroupName $ResourceGroupName ` -Location $Location ` -SslPolicy $AppGwSslPolicy ` -GatewayIPConfigurations $GatewayIPconfig ` -SslCertificates $sd1SSLCertificate,$sd2SSLCertificate ` -FrontendPorts $FrontEndPort ` -FrontendIPConfigurations $FrontEndIpConfig ` -Sku $Sku ` -HttpListeners $Sd1HttpListener,$Sd2HttpListener ` -BackendAddressPools $Sd1BackendPool,$Sd2BackendPool ` -BackendHttpSettingsCollection $Sd1HttpBackendSettings,$Sd2HttpBackendSettings ` -RequestRoutingRules $Sd1RoutingRule,$Sd2RoutingRule # Adding the associated health probes Write-Host "Adding sd1 health probe" $AppGw = Add-AzApplicationGatewayProbeConfig -ApplicationGateway $AppGw ` -name sd1healthprobe ` -protocol https ` -hostname $Sd1WebAppFqdn ` -path "/" ` -interval 30 ` -timeout 120 ` -unhealthythreshold 3 Write-Host "Adding sd2 health probe" $AppGw = Add-AzApplicationGatewayProbeConfig -ApplicationGateway $AppGw ` -name sd2healthprobe ` -protocol https ` -hostname $Sd2WebAppFqdn ` -path "/" ` -interval 30 ` -timeout 120 ` -unhealthythreshold 3 # Saving the application gateway Write-Host "Saving updated Application Gateway" $AppGw = Set-AzApplicationGateway -ApplicationGateway $AppGw Write-Host "Updating Backend Http Settings with custom probes" # Attach the probes to the backend settings $Sd1HttpBackendSettings = Get-AzApplicationGatewayBackendHttpSettings -Name sd2HttpBackendSettings ` -ApplicationGateway $AppGw $Sd1HealthProbe = Get-AzApplicationGatewayProbeConfig -ApplicationGateway $AppGw ` -Name sd1healthprobe $AppGw = Set-AzApplicationGatewayBackendHttpSettings -ApplicationGateway $AppGw ` -Name sd1HttpBackendSettings ` -Port 443 ` -Protocol Https ` -CookieBasedAffinity Disabled ` -RequestTimeout 60 ` -HostName $Sd2Hostname -Probe $Sd1HealthProbe $Sd2HttpBackendSettings = Get-AzApplicationGatewayBackendHttpSettings -Name sd2HttpBackendSettings ` -ApplicationGateway $AppGw $Sd2HealthProbe = Get-AzApplicationGatewayProbeConfig -ApplicationGateway $AppGw ` -Name sd2healthprobe $AppGw = Set-AzApplicationGatewayBackendHttpSettings -ApplicationGateway $AppGw ` -Name sd2HttpBackendSettings ` -Port 443 ` -Protocol Https ` -CookieBasedAffinity Disabled ` -RequestTimeout 60 ` -HostName $Sd2Hostname -Probe $Sd2HealthProbe Write-Host "Saving updated Application Gateway" $AppGw = Set-AzApplicationGateway -ApplicationGateway $AppGw |
Update 2020-02-16:
If you want to use a keyvault to auto rotate your certificates, you can adapt the above PowerShell script with the following:
|
1 2 3 4 5 6 7 8 9 10 11 12 13 14 15 16 17 18 19 20 21 22 23 24 25 26 27 28 29 30 31 32 33 34 35 36 37 38 39 40 41 |
$AppGatewayUserAssignedIdentityName = "identity-appgateway-agdemo" $KeyVaultName = "keyvault-agdemo" $KeyVaultCertificateNameSd1 = "sd1-test-com" $KeyVaultCertificateNameSd2 = "sd2-test-com" $Identity = Get-AzUserAssignedIdentity -Name $AppGatewayUserAssignedIdentityName -ResourceGroupName $ResourceGroupName -ErrorAction SilentlyContinue if ($null -eq $Identity) { # Create UserAssigned Identity Write-Host "Creating User Assigned Identity" $Identity = New-AzUserAssignedIdentity -Name $AppGatewayUserAssignedIdentityName ` -Location $Location ` -ResourceGroupName $ResourceGroupName Write-Host "Sleeping 10 seconds for the identity to be created in AAD" Start-Sleep -Seconds 10 } else { Write-Host "User Assigned Identity exists. Skipping creation" } Write-Host "Creating Application Gateway Identity" $AppGwIdentity = New-AzApplicationGatewayIdentity -UserAssignedIdentityId $Identity.Id Write-Host "Setting KeyVault permissions" Set-AzKeyVaultAccessPolicy -VaultName $KeyVaultName -PermissionsToSecrets get -ObjectId $Identity.PrincipalId $CertificateSd1 = Get-AzKeyVaultCertificate -VaultName $KeyVaultName -Name $KeyVaultCertificateNameSd1 $Sd1SecretId = $Certificate.SecretId.Replace($CertificateSd1.Version, "") #Create SSL Cert binding with KeyVault Write-Host "Creating SSL certificate for SD1 binding to KeyVault secret" $Sd1SSLCertificate = New-AzApplicationGatewaySslCertificate -Name sd1SSLCertificate -KeyVaultSecretId $Sd1SecretId Write-Host "Setting KeyVault permissions" Set-AzKeyVaultAccessPolicy -VaultName $KeyVaultName -PermissionsToSecrets get -ObjectId $Identity.PrincipalId $CertificateSd2 = Get-AzKeyVaultCertificate -VaultName $KeyVaultName -Name $KeyVaultCertificateNameSd2 $Sd2SecretId = $Certificate.SecretId.Replace($CertificateSd2.Version, "") #Create SSL Cert binding with KeyVault Write-Host "Creating SSL certificate for SD2 binding to KeyVault secret" $Sd2SSLCertificate = New-AzApplicationGatewaySslCertificate -Name sd2SSLCertificate -KeyVaultSecretId $Sd1SecretId |
Dom I have some questions!
So I am using LetsEncrypt certificate on my Application Gateway and I want to automate the renewal process. How can I do that?
David Rodriguez wrote an excellent article on this topic called Automating Azure Application Gateway SSL certificate renewals with Let’s Encrypt and Azure Automation. Check it out!
Can I use Azure KeyVault to store my certificates instead of directly in the Application Gateway?
Yes it is possible. If you are using PowerShell, when creating your SSL Certificate you can use something like this
|
1 2 3 |
$secret = Get-AzKeyVaultSecret -VaultName keyvault01 -Name sslCert01 $secretId = $secret.Id $cert = New-AzApplicationGatewaySslCertificate -Name Cert01 -KeyVaultSecretId $secretId |
However, the automatic renewal, as mentioned above, will not work as-is. It will need some rework.
I want to restrict access using IP restrictions to my Application Gateway. Is it possible?
It is possible to whitelist some IP addresses or range in cases where you wouldn’t want your UAT, for example, to not be publicly accessible but available to a specific set of users. Refer to the documentation on how to do that.
How does the Application Gateway handle WebSocket traffic?
As mentioned in the portal under the SSL Policy, Application Gateway provides native support for WebSocket across all gateway sizes. There is no additional configuration required to enable or disable WebSocket support. If a WebSocket traffic is received on the Application Gateway, it is automatically directed to the WebSocket enabled backend server using the appropriate backend pool as specified in the application gateway rules.
On that note
I hope this article can help you get started with the Application Gateway. Stay tuned for a sequel where I show how we can have fun with the WAF component of the Application Gateway.
1 https://docs.microsoft.com/en-us/azure/application-gateway/quick-create-powershell#required-network-resources