
SSL certificates management using Lets Encrypt, Azure Automation and Web Apps
I’ve been doing a lot of automation lately in regards to SSL certificates and Lets Encrypt. As you know, and I’m sure you are the same, I do not like redoing stuff over and over when I can just automate the process. Azure Az PowerShell modules gives us a lot of flexibility for that and I like to take advantage of it.
In this post, I would like to guide you on how you can achieve
- Automating the generation of Lets Encrypt certificate to your Key Vault using Azure Automation
- Updating the certificate on your App services so that you can rebind it to your Web Apps
Automation of generation of Lets Encrypt certificate(s)
Lets Encrypt has a way of generating SSL certificates through the ACME protocol. This post supposes you are familiar with the ACME v2 protocol and how it works. If not, you can always go and read up on the excellent documentation of Lets Encrypt or if you’re a tough one, read the RFC of the ACME protocol.
In order to help us go through the Lets Encrypt / ACME certificate generation flow, I used the library ACME-PS. The library handles account generation, order creations, authorizations, challenges, and certificates exports.
Ok, just tell me how you did it
The idea behind all the certificate automation goes as follows:
- Create the Lets Encrypt state, which creates an account with your key to have ownership of the certificate lifecycle (creation, revocation, etc). If the account has already been created, load the state instead.
- Generate a new order using the DNS challenge for the hostname you want to create a certificate for. This can include wildcards.
- Export the certificate to the key vault for future use
What do I need to get this done?
To achieve the idea above, you need the following Azure resources in place
- Storage account to be able to save and load the state when generating new certificates
- Azure DNS so that the automation can automatically add the proper DNS TXT record for challenge verification
- Azure Key Vault to save the requested certificate and to get the password to export the certificate from the Lets Encrypt flow
Setting the Azure Automation
The first thing you need is to create an Automation account. Navigate to the portal, click the + Create a resource button, and search for Automation.
When creating the automation resource, make sure you have the Create Azure Run As Account set to yes.
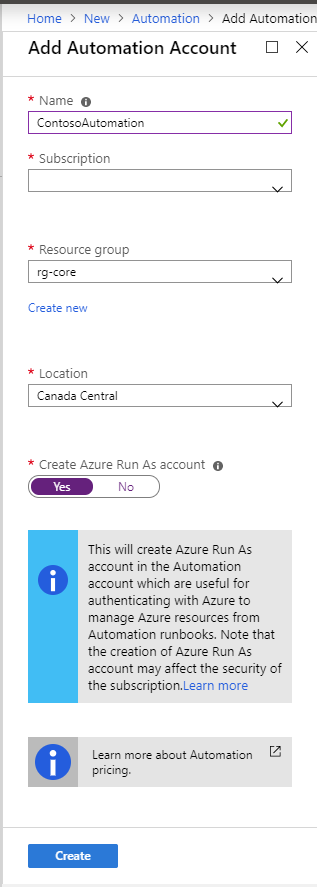
When you create your automation resource, Azure will create for your 3 starters runbooks. You can decide to keep them to learn or delete them. If you’re new to Azure Automation, check them out to give you an idea of what you can do!
At this point, you need to create a new Runbook. Navigate to the Runbook blade and click Create a runbook. Give it a name and choose PowerShell as the runbook type.
You should end up with something like the following (minus the authoring status and the name).
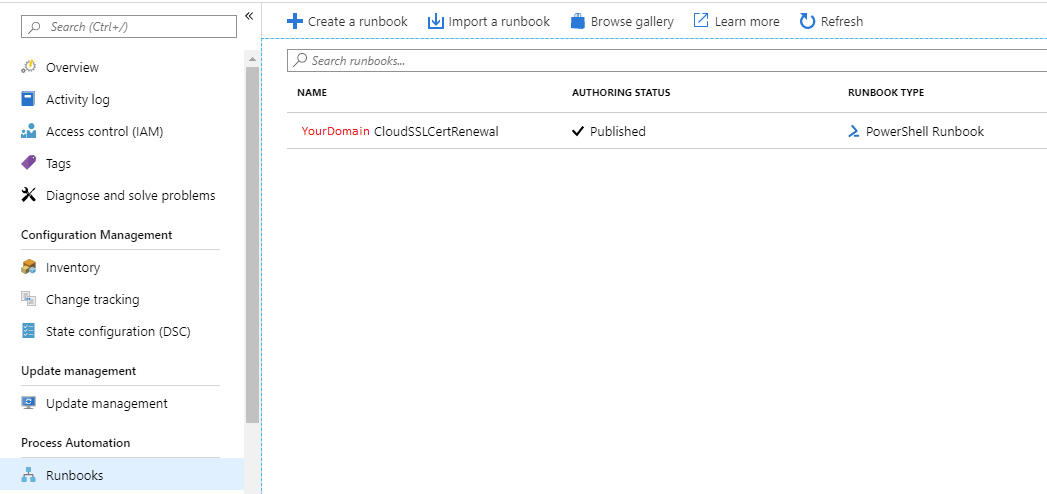
Once your runbook has been created you can go ahead and edit it. Once in edit mode, copy and paste the script located in my GitHub repository (letsencryptrunbook.ps1) and press the publish button.
Adding the required modules
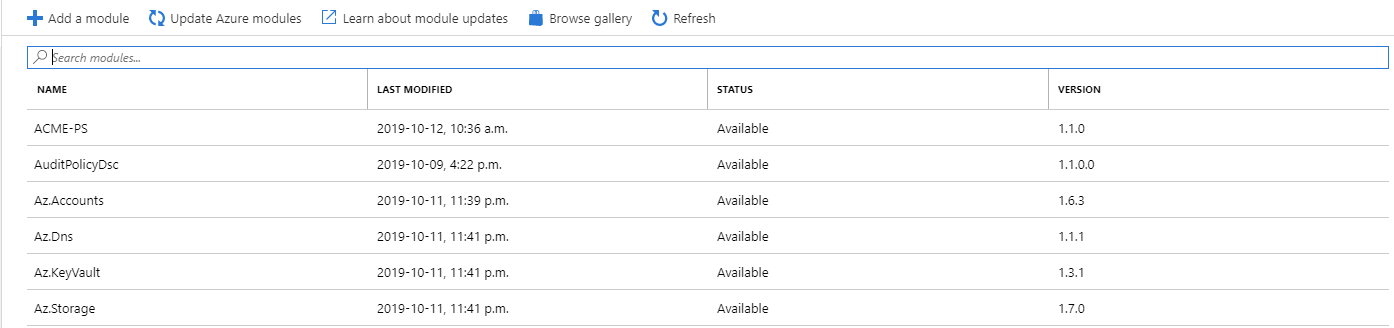
In order for this runbook to run, we need to add the required module the script uses.
Navigate to the Modules blade, and then click on the Browse gallery.
Search for Az.Accounts and click import. Then import the following once it has been imported:
- Az.Dns
- Az.Storage
- Az.KeyVault
- ACME-PS
Giving access to the automation service principal
In order for the automation service principal to add the certificate to your key vault, you need to give it access.
In your key vault, add an access policy to the certificates section with the import and get permission for the service principal that starts with the name of your Automation resource and ends with some unique string. Do the same for the secrets section and give the get permission to the principal.
First run
It’s now the time to run the runbook to generate our certificate.
Press the start button. You need to pass parameters to the script/runbook. The following parameters are available:
| Parameter | Description |
|---|---|
| ResourceGroupName | Specifies the resource group name where the storage account, key vault and dns reside. |
| StorageAccountName | Specifies the storage account name to use to store the state of the letsencrypt account(s). |
| ContactEmails | Specifies the contact emails to use when creating a new lets encrypt account is created. Enter a value such as [“email1″,”email2”] |
| DnsName | Specifies the dns that a certificate needs to be created for. For wildcards, use *.hostname.tld |
| KeyVaultName | Specifies the name of the keyvault where the certificate will be stored. |
| StorageContainerName | Specifies the certificate password once it has been issued by Lets Encrypt. |
| KeyVaultCertificateSecretName | Specifies the key vault secret name of the certificate password that will be used to export the certificate once it has been issued by Let’s Encrypt. |
| Test | Specifies whether to use lets encrypt staging/test facily or production facility. |
| VerboseOutput | Specifies whether to set the VerbosePreference to continue. This is the same as passing the -Verbose parameter to scripts |
If everything went smoothly, you should see completed in your recent jobs and you should have your certificate available for you in your key vault.
Adding a schedule
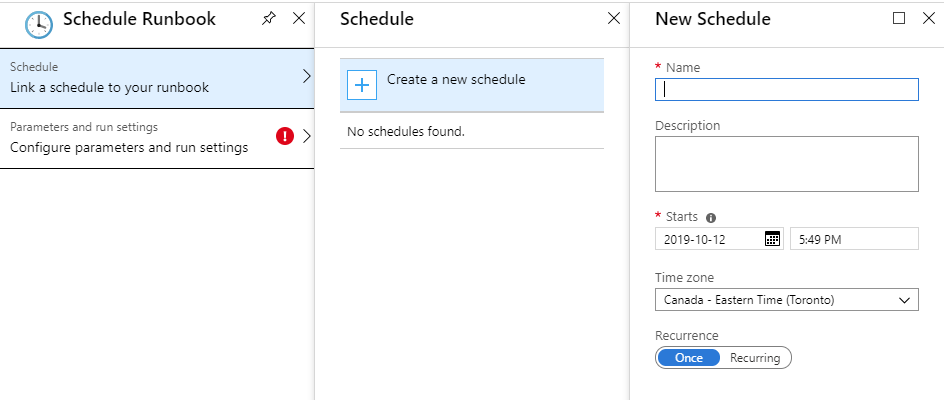
You obviously will not want to click run for all your certificates all the time. As such, you will want to create a schedule that will run this runbook automatically.
Under the Schedules blade, click Add a schedule. Create a new schedule and then enter the parameters. Voila, you will then have your certificates renewed automatically!
Associate the newly created certificate into the Web Apps
As a general rule, I like to keep my certificates in a single place and that place is my core key vault. I then use it to provision, for instance, my web apps and my application gateways (v2!)
The problem many encounter is that, once they have added a new version of the certificate, it is not refreshed in their app services. When you import a certificate from the key vault to an app service, it creates a new resource of type Microsoft.web/certificates and copies the certificate there but keeping a reference to your key vault. You thus need to refresh the certificate with the new version in that resource.
Currently, Azure portal doesn’t support deploying external certificate from Key Vault, you need to call Web App ARM APIs directly using ArmClient/Resource Explorer/Template Deployment Engine.1
I’ve created a PowerShell script to help with this as I did not want to go through ARM/utility client but rather continue scripting my automation. The script will essentially go and grab the certificate from the key vault and update it in the app services certificate associated resource (Microsoft.web/certificates).
Once the resource has been updated, you can go and rebind that certificate to your web apps so that they don’t fall into the expire category which can cause quite some panic.
|
1 2 3 4 5 |
$dnsName = "*.contoso.com" $resourceGroupName = "ContosoRG" $webAppHostname = "www.contoso.com" $thumbPrint = (Get-AzWebAppCertificate -ResourceGroupName $resourceGroupName | Where-Object { $_.SubjectName -eq $dnsName }).ThumbPrint New-AzWebAppSSLBinding -ResourceGroupName $resourceGroupName -WebAppName "ContosoWebApp" -Thumbprint $thumbPrint -Name $webAppHostname |
Bonus
You can also Resource Graph PowerShell module, Search-AzGraph, to go and query your web apps to determine the expiration date of your certificates.
|
1 |
Search-AzGraph -Query 'where type =~ "microsoft.web/certificates" | project SubjectName = properties.subjectName, ExpirationDate = properties.expirationDate, SubscriptionName = subscriptionDisplayName, TenantName = tenantDisplayName' -Include DisplayNames |
Hopefully this gave you another appreciation on how you can automate your certificate renewal. If you enjoy this post, be sure to share it! Also if you enjoy the scripts and feel like you can and want to improve them, don’t be shy to do a pull request!
Happy automation 🙂