
Synchronizing node version with your environment in Visual Studio 2017
Visual Studio 2017 is official finally out and Microsoft did a tremendous job in listening to their user base. They simplified the install process, enhanced the speed of the load of the projects, enhanced their IntelliSense and debugging tools to say the least. If you have not tried it yet, go and grab yourself a copy today! The community edition is free and is available to everyone!
On that note, one may remember the nodejs binding problem that would occur in Visual Studio 2015 when it comes to gulp and node-sass
|
1 2 3 4 5 6 7 8 9 10 11 12 13 14 15 16 |
Error: Missing binding PATH_TO_YOUR_PROJECT\node_modules\gulp-sass\node_modules\node-sass\vendor\win64-x64-51\binding.node Node Sass could not find a binding for your current environment: Windows 64-bit with Node.js 7.x Found bindings for the following environments: - Windows 64-bit with Node.js 5.x This usually happens because your environment has changed since running `npm install`. Run `npm rebuild node-sass` to build the binding for your current environment. at Object.<anonymous> (PATH_TO_YOUR_PROJECT\node_modules\gulp-sass\node_modules\node-sass\lib\index.js:15:11) at Module._compile (module.js:397:26) at Object.Module._extensions..js (module.js:404:10) at Module.load (module.js:343:32) at Function.Module._load (module.js:300:12) at Module.require (module.js:353:17) at require (internal/module.js:12:17) at Object.<anonymous> (PATH_TO_YOUR_PROJECT\node_modules\gulp-sass\index.js:187:21) at Module._compile (module.js:397:26) at Object.Module._extensions..js (module.js:404:10) |
This happens because Visual Studio has a set of paths that are searched to find node/npm etc. By default Visual Studio 2017 comes with Node 5.4.1 and npm 3.3.4 shipped. As you may know from one of my previous posts, you can manage and update the version of node and npm of your system. You thus may want to use those version in Visual Studio. To do so, you need to do the following:
- I assume that nodejs and npm are in your environment paths. To find out if they are, run the following in a powershell window
$env:path.split(";")
- If they are not in your environment, you may want to find the location of node, by default node install to C:\Program Files\nodejs
- Now in Visual Studio, go to Tools -> Options -> Projects and Solutions -> Web Package Management -> External Web Tools
- In the location of the external tools, you see that $(PATH) is 3rd in the search list. Move it up the chain to the first. If you want to use a specific location of node, you may want to add a location and set it as the first of the chain.
- Restart your Visual Studio for it to take effect
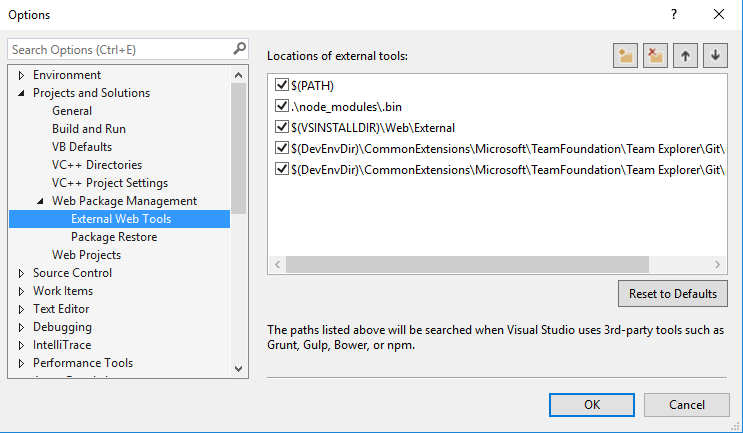
Visual Studio 2017 External Web Tools