
Deploying EOL .NET Core to Azure App Services
As you all know, .NET Core 3.1 is now out of support since December 13 2022. If you follow me on my social media, I reminded my followers about this a little over a month ago. Unfortunately, some of the customers my colleagues and I deal with, have yet to migrate, and were caught by surprise at the last minute.
I am and have been advising my customers to plan some time to migrate to .NET 6 (which is LTS), however, the time and priorities issue always come back. Fortunately, there are 2 solutions that you can put in place today to be able to continue deploying EOL .NET core versions.
Solution 1: Deploying the application using the self-contained method
This is the easiest method. Self-contained method refers to the ability to publish your app as a platform-specific executable. The output publishing folder contains all components of the app, including the .NET libraries and target runtime. The app is isolated from other .NET apps and doesn’t use a locally installed shared runtime. The user of your app isn’t required to download and install .NET1.
To do this, simply add the --self-contained argument of the dotnet publish CLI command. The --self-contained argument requires the -r (or --runtime) argument which takes a runtime identifier (RID).
Example
The command below publishes an application as Windows, not version-specific, in 64 bit.
dotnet publish -o path/to/output/folder -r win-x64 --self-contained
You can move the contents, located in path/to/output/folder, to the site in App Service (Web App). For more information, see the documentation.
Solution 2: Add the ASPNetCore runtime version as an extension on the Web App
This solution works as well and can be used in times where you don’t want or cannot change your publishing (i.e. you don’t have access to the underlying pipeline).
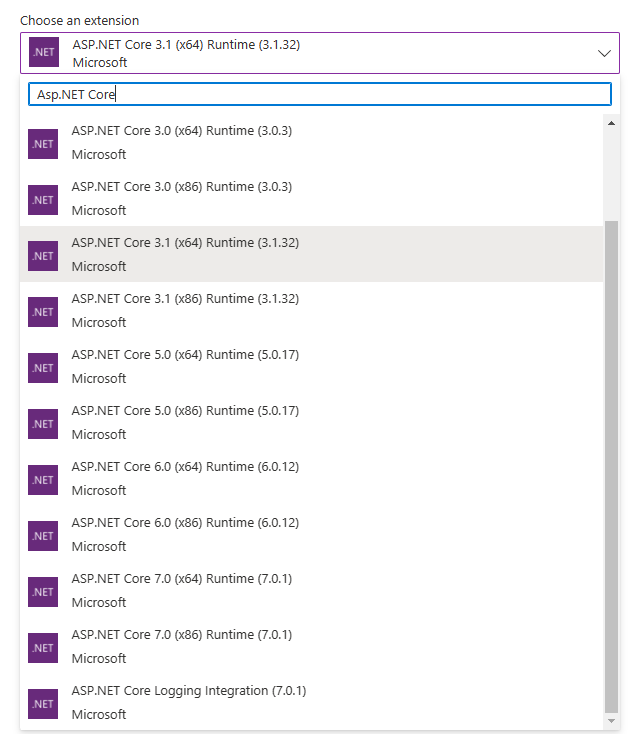
Step 1: Add the extension to the web app
The extension is a NuGet package that gets extracted to Web App under the SiteExtensions folder. The runtime is extracted in this folder, specifically D:\home\SiteExtensions.
In the portal, in your WebApp, navigate to the Extensions blade and select Add. Search for Asp.NET Core and add the version you are interested in, make sure to accept the legal terms. In my case, it will be Asp.NET Core 3.1 (x64) runtime.
Using the az cli you can achieve this as well through the command
With PowerShell:
Step 2: changing the web.config to point to the correct executable
When you publish your application to get all the components of your application, you will realize that the publish process creates a web.config file for you that will be used by IIS to serve your application.
The important line in this file is
In order to use the installed extension, you will need to change the process path to point to the installed runtime extension, that is
|
1 |
<aspNetCore processPath="D:\home\SiteExtensions\AspNetCoreRuntime.3.1.x64\dotnet" arguments=".\test.dll" stdoutLogEnabled="false" stdoutLogFile=".\logs\stdout" hostingModel="inprocess" /> |
The extension that I installed lives in the directory D:\home\SiteExtensions\AspNetCoreRuntime.3.1.x64.
If you are looking to automate this so that you don’t have to change the web.config automatically every time you publish, you can add a web.config transform (i.e. web.release.config which uses the web.<configuration>.config pattern) file at the root of your application source code (where the CSProj lives) that will update the web.config appropriately.
|
1 2 3 4 5 6 7 8 |
<?xml version="1.0" encoding="utf-8"?> <configuration xmlns:xdt="http://schemas.microsoft.com/XML-Document-Transform"> <location> <system.webServer> <aspNetCore xdt:Transform="SetAttributes(processPath)" processPath="D:\home\SiteExtensions\AspNetCoreRuntime.3.1.x64\dotnet" /> </system.webServer> </location> </configuration> |
Note that this file will be added to your publish output unless you set the build action to None.
If you want to learn more about transform, see the documentation.
But Dom, what about…
Azure Functions
With Azure Functions, if you are using .NET Core 3.1 (or a version older than that (please tell me that you are not 🙂)) , you are out of luck. If you are using .NET 5 or above, you can use an isolated model.
For the migration guidance to Azure Function version 3.x to 4.x, see the documentation.
My Web App runs in a Linux App Service
Solution 2 does not work for you. You will need to use Solution 1: deploying your application in a self-contained manner.
The runtime I use is not on the App Services image
You can roll forward in terms of versions for certain scenarios (see the documentation on Framework-dependent apps roll-forward). However, you cannot roll backwards, i.e. you specify 3.1.32 but 3.1.31 is installed. For that you will need to use the solutions I mentioned above.