
Managing multiple SSH keys for authentication to GitHub on Windows 10
Where I currently work, we have the opportunity to use our own personal computers to work. This means I’m able to use my own super computer. The company hosts their code on GitHub. In order to not mix my personal GitHub account and my work account, I created a new GitHub account for my work.
GitHub has a limitation that it cannot use the same public key for 2 different accounts. As such, I created a new pair of keys to authenticate
|
1 |
ssh-keygen -t rsa -m pem -f ~\.ssh\id_work_rsa |
The idea now is that I want to be able to use both keys and both accounts simultaneously. I want to also not have to enter my ssh key pass every time I do an operation. You can do that if you use ssh-agent. If you are a putty user, you may be familiar with pageant (putty agent).
Windows 10 comes preinstalled with OpenSSH. However, by default, ssh-agent is not enabled. You can start it and make it start on startup by going to your services and searching for OpenSSH Authentication Agent.
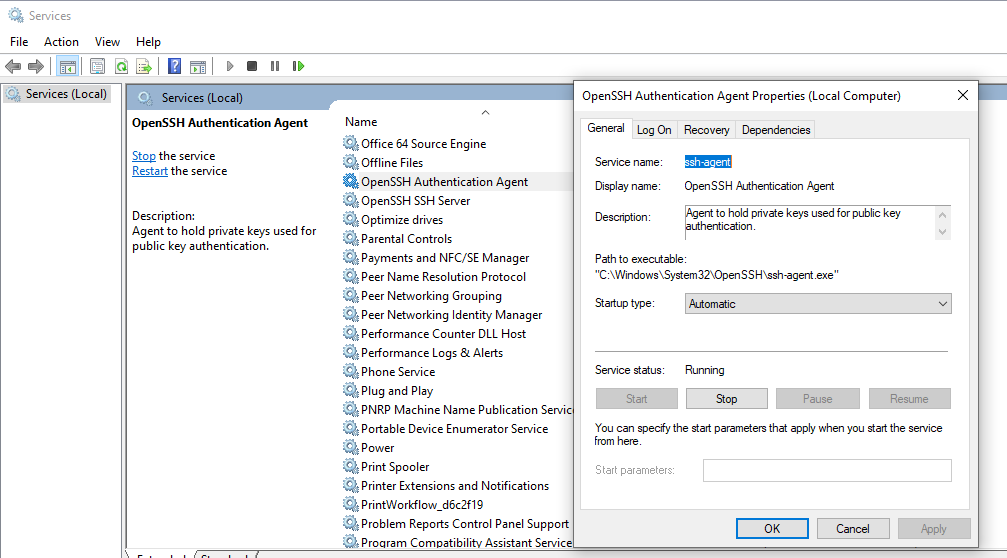
SSH Agent Windows Services
After starting it, you can add your keys by using the command ssh-add. ssh-add without a parameter adds the default ~/.ssh/id_rsa key. If you want to add another key located elsewhere, you can do that by executing the following command: ssh-add C:\path\to\other\id_rsa
Since you are hitting the same “host” (github.com), you need to create a SSH config to distinguish which key you will use for which GitHub account.
Create a config file in ~\.ssh named ~\.ssh\config. ~ represents your home directory.
In the config file :
|
1 2 3 4 5 6 7 8 9 10 11 |
# Default GitHub user Host github.com HostName github.com User git IdentityFile ~/.ssh/id_rsa # Work user account Host github.com-work HostName github.com User git IdentityFile ~/.ssh/id_work_rsa |
Now you can go ahead and clone your repositories:
|
1 2 3 4 5 |
# personal git clone git@github.com:Organization/repository_name.git repository_name # work git clone git@github.com-work:Organization/repository_name.git repository_name |
note the -work after the github.com for the work account. This matches the ssh config file Host github.com-work.
If you are using OpenSSH that comes with Windows 10, you may get the following error when you try to clone:
warning: agent returned different signature type ssh-rsa (expected rsa-sha2-512)
This is an issue with the version of the SSH tools.
To resolve the issue do the following:
- Stop the OpenSSH Authentication Agent, if it is running.
- Download OpenSSH release from https://github.com/PowerShell/Win32-OpenSSH/releases
- Rename C:\Windows\System32\OpenSSH to C:\Windows\System32\OpenSSH.old
- Create a folder named OpenSSH in C:\Windows\System32
- Unpack and move the new release to C:\Windows\System32\OpenSSH
- Using a PowerShell terminal in administrator mode, run the script C:\Windows\System32\OpenSSH\install-sshd.ps1
You can now restart your OpenSSH Authentication Agent. It is a good idea to set the Agent to start automatically.
2020-11-03 edit:
You also will need to change the SSH utility used by GIT. Add an environment variable in your SYSTEM variables, named GIT_SSH, with the following: C:\Windows\System32\OpenSSH\ssh.exe
You can get the path of SSH by executing the following command in PowerShell: (Get-Command -Name ssh).Source
Other possibility
If you don’t want to replace the base OpenSSH toolset with a new version, you can unpack the new version to a folder of your choice, then start ssh-agent manually (or create another service task manually). You will also need to tell git to use the new ssh.exe located in that folder. You can do that by override the core.sshCommand as such:
|
1 |
git config --global --replace-all core.sshCommand "'C:\path\to\new\OpenSSH\ssh.exe'" |